Medial landmarks
Vertex
Abbreviature: v´
Laterality: Medial
Type: 3
Standardized definition (Caple y Stephan, 2015): Most superior point of the head.
Approximation in the image: View the entire face or zoom in on the upper portion of the head.
Anatomical reference areas: Upper contour of the head.
Guidelines for Skeleton·ID frontal view marking:
In frontal view, place vertex on the highest point of the head in frontal view. The vertical line should be in the midsagittal plane on the face and, posteriorly, the horizontal line should be placed in contact with the upper edge of the head.
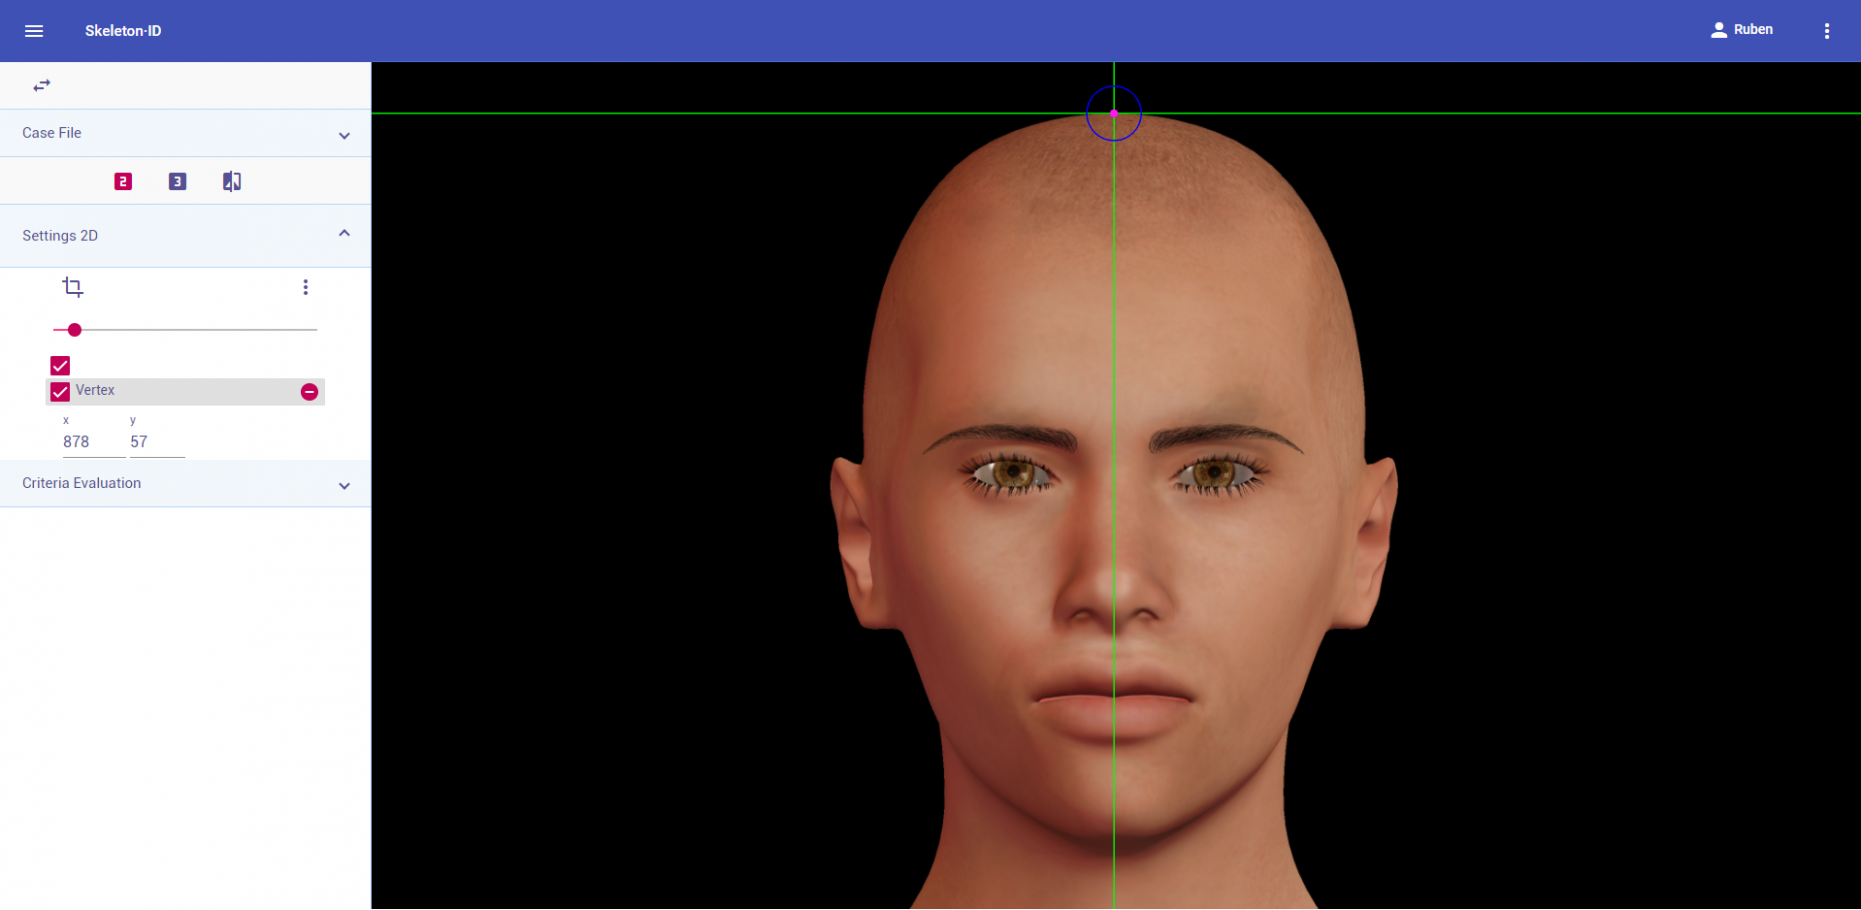 Figure 1. Vertex in frontal view. General shot of the image.
 Figure 2. Vertex in frontal view. Approximation in the image.
Guidelines for Skeleton·ID lateral view marking:
Place vertex on the highest point of the head in lateral view, using the horizontal line as a reference. The horizontal line must be in contact with the uppermost edge of the head contour and the vertical line at the intersection, with the most prominent point.
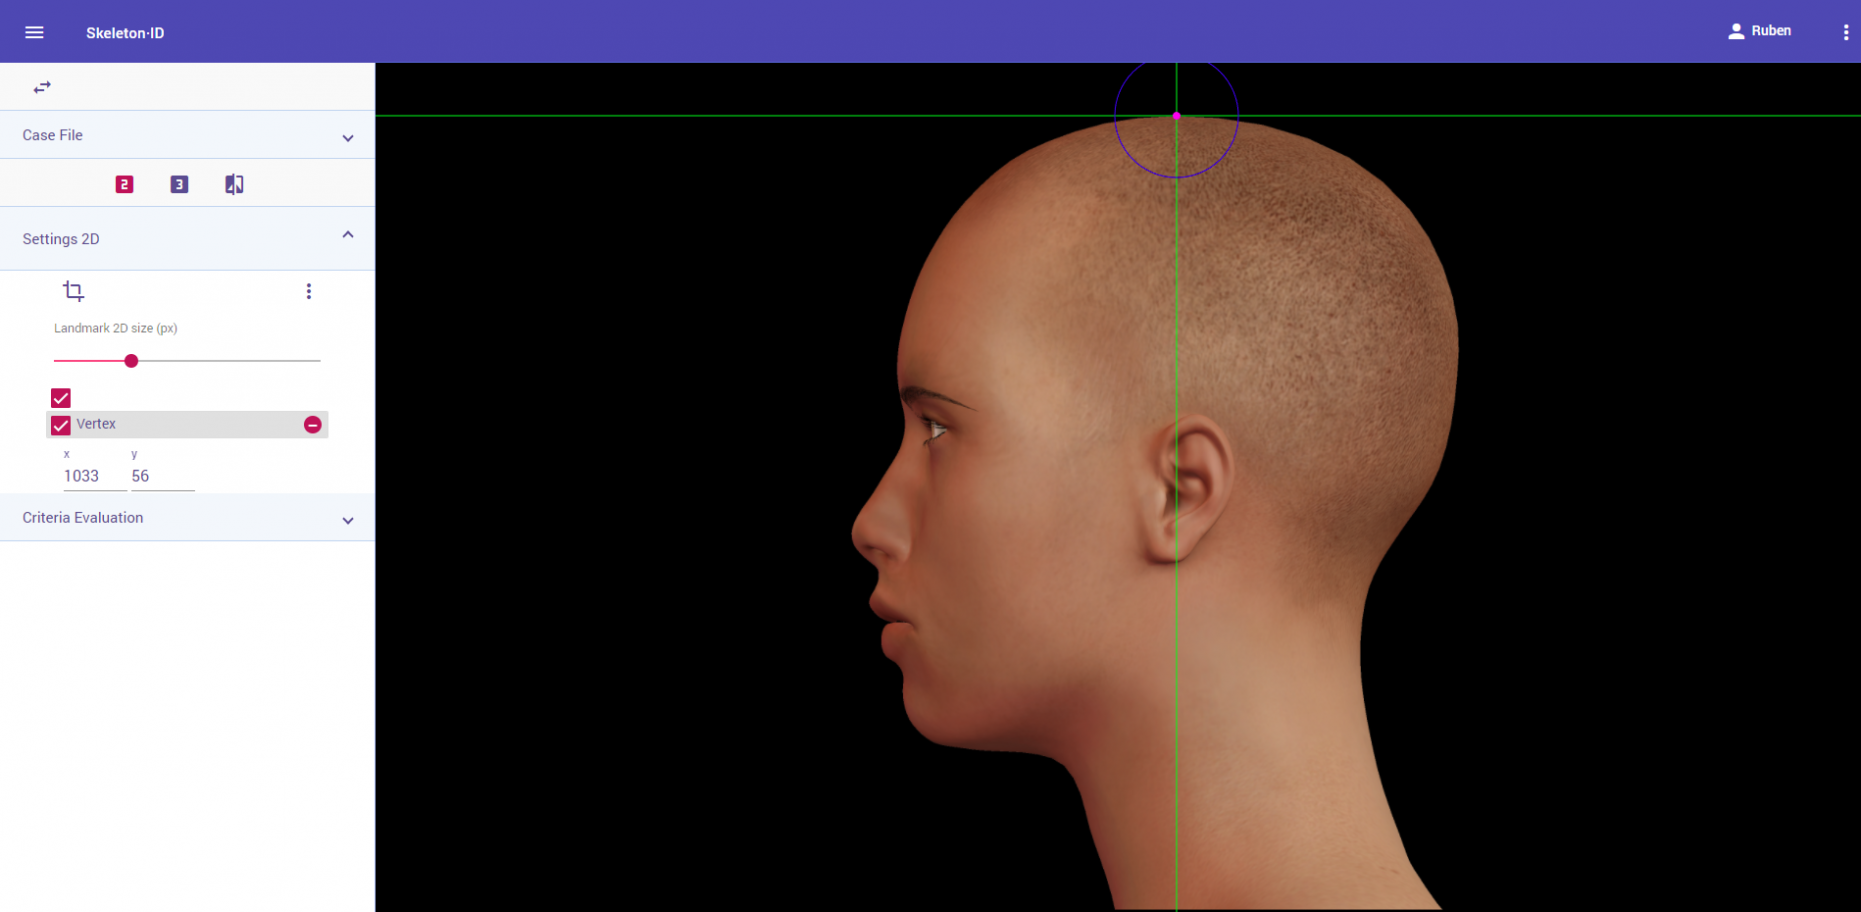 Figure 3. Vertex in lateral view. General shot of the image.
 Figure 4. Vertex in lateral view. Approximation in the image.
Observations:
- In the case of subjects with hair, due to the difficulty of estimating the upper contour of the head, it is not recommended to mark this point.
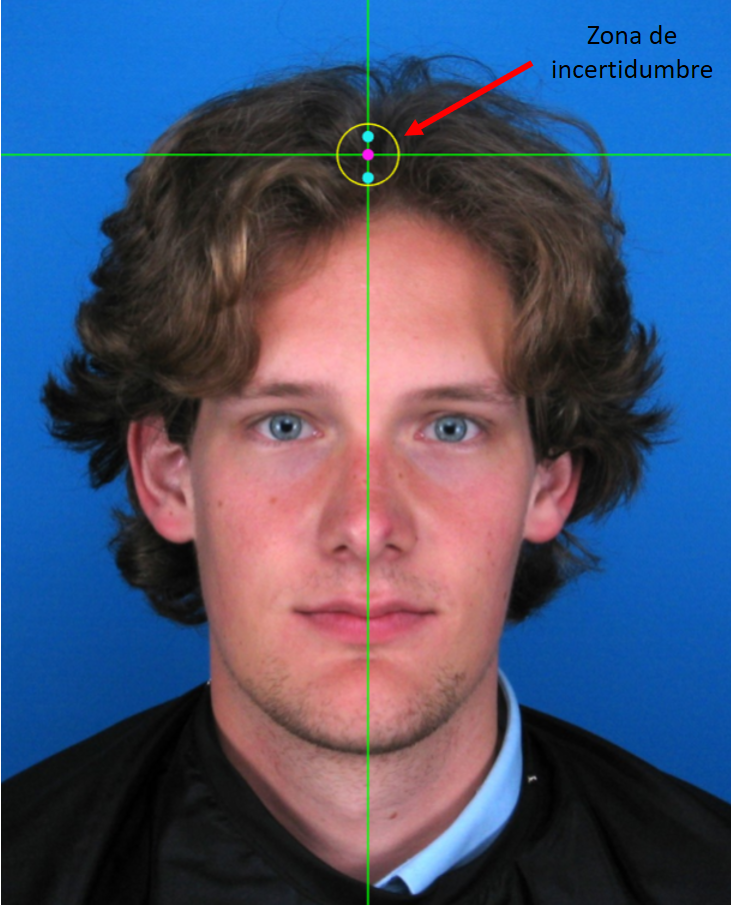 Figure 5. Uncertainty area for vertex marking in subjects with hair.
- Note that in images with an almost frontal pose it will be necessary to estimate the midsagittal plane using the vertical reference line (this observation applies for the remainder of points placed in the midsagittal plane).
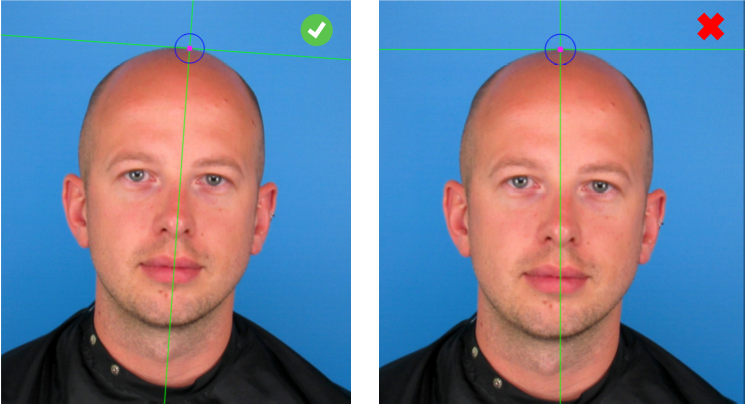 Figure 6. Correct vertex marking in an image with an almost frontal pose (left) and wrong marking in the same image (right).
- In oblique images, the most superior point of the head cannot be determined, even on hairless subjects.
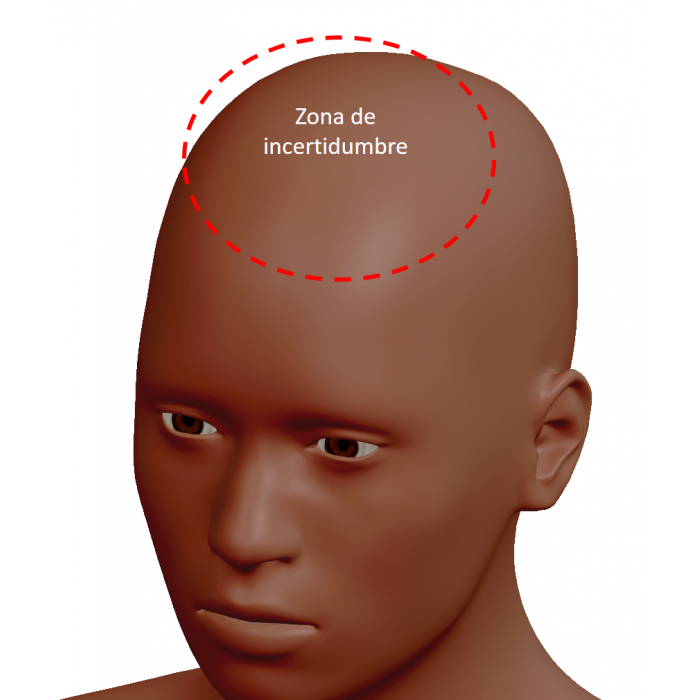 Figure 7. Uncertainty area of the upper contour of the head in an oblique view image.
Glabella
Abbreviature: g´
Laterality: Medial
Type: 3
Standardized definition (Caple y Stephan, 2015): Most anterior midline point on the forehead, in the region of the superciliary ridges.
Approximation in the image: Zoom in on the upper portion of the face.
Anatomical reference areas: Forehead and brow ridges.
Guidelines for Skeleton·ID frontal view marking:
Place glabella in the midsagittal plane between the upper edge of the eyebrows. The vertical line should be located in the midsagittal plane of the face and the horizontal line at the level of the upper edge of the eyebrows.
 Figure 8. Glabella in frontal view. General shot of the image.
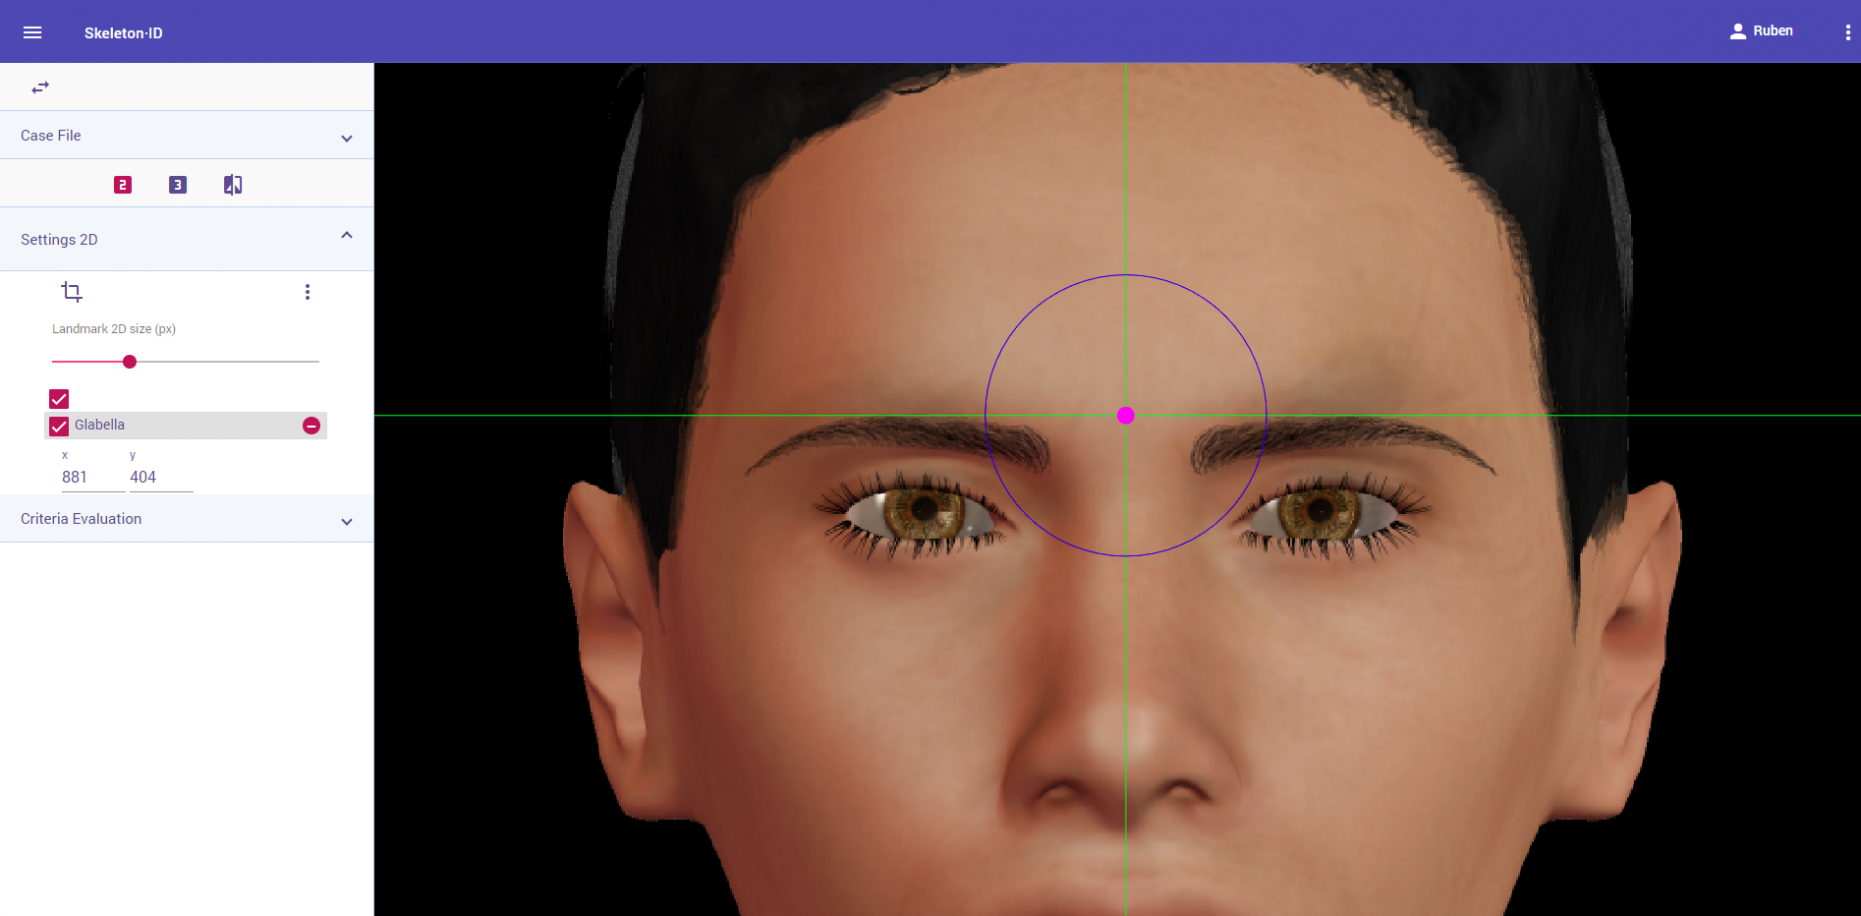 Figure 9. Glabella in frontal view. Approximation in the image.
Guidelines for Skeleton·ID lateral view marking:
Place glabella at the most prominent point of the forehead at the level of the brow ridge. The vertical line should be located on the edge of the forehead at the height of the brow ridge (in the most prominent area) and the horizontal line on the upper edge of the eyebrow.
 Figure 10. Glabella in lateral view. General shot of the image.
 Figure 11. Glabella in lateral view. Approximation in the image.
Guidelines for Skeleton·ID oblique view marking:
Place glabella at the midpoint of the forehead at the level of the brow ridge. Use the vertical and horizontal auxiliary line as reference. The vertical line should be located at the midpoint of the brow ridges and the horizontal line on the upper edge of the eyebrows. Note that it may be necessary to rotate the axis of the auxiliary lines to position the horizontal line on the eyebrows.
 Figure 12. Glabella in oblique view. General shot of the image.
 Figure 13. Glabella in oblique view. Approximation in the image.
Observations:
- According to interobserver studies (Campomanes-Álvarez et al., 2015), glabella can be placed with a high frequency (80%) in facial images regardless of the view (frontal, lateral or oblique).
- Note that when the eyebrows are absent/modified either due to waxing or other hair removal methods and aesthetic procedures, the brow ridge should be taken as a reference.
Photographic examples:


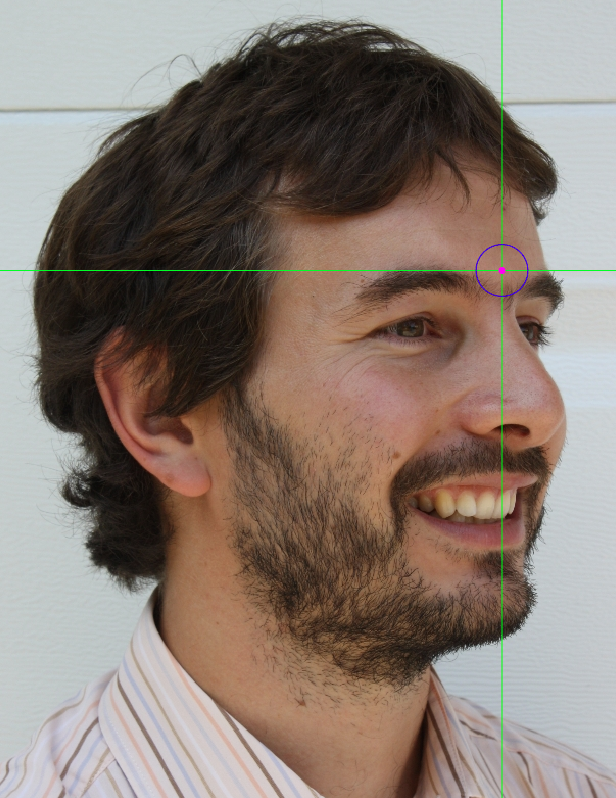 Figure 14. Glabella marking on a photograph in frontal view (left), lateral view (center) and oblique view (right).
Nasion
Abbreviature: n´
Laterality: Medial
Type: 1
Standardized definition (Caple y Stephan, 2015): Point directly anterior to the nasofrontal suture, in the midline, overlying the craniometric landmark n.
Approximation in the image: Zoom in on the upper half of the face.
Anatomical reference areas: Nasal root.
Guidelines for Skeleton·ID frontal view marking:
Place nasion over the nasal root, at the height of the nasofrontal suture in frontal view. The vertical line should be aligned with the midsagittal plane and the horizontal line at the height of the nasofrontal suture (highest point on the nasal bridge). in frontal view.
 Figure 15. Nasion in frontal view. General shot of the image.
 Figure 16. Nasion in frontal view. Approximation in the image.
Guidelines for Skeleton·ID lateral view marking:
Place nasion on the most posterior point of the curve covering the nasofrontal suture area in lateral view. The horizontal line should be placed at this height (the most superior point in the curve of the nasal bridge), and the vertical line should be placed on the edge of the nasofrontal suture area in lateral view.
 Figure 17. Nasion in lateral view. General shot of the image.
 Figure 18. Nasion in lateral view. Approximation in the image.
Guidelines for Skeleton·ID oblique view marking:
Place nasion over the root of the nose, at the height of the nasofrontal suture in oblique view. The vertical line should be positioned in the medial point between the eyebrows, and the horizontal line should be at the height of the nasofrontal suture (highest point in the nasal bridge).
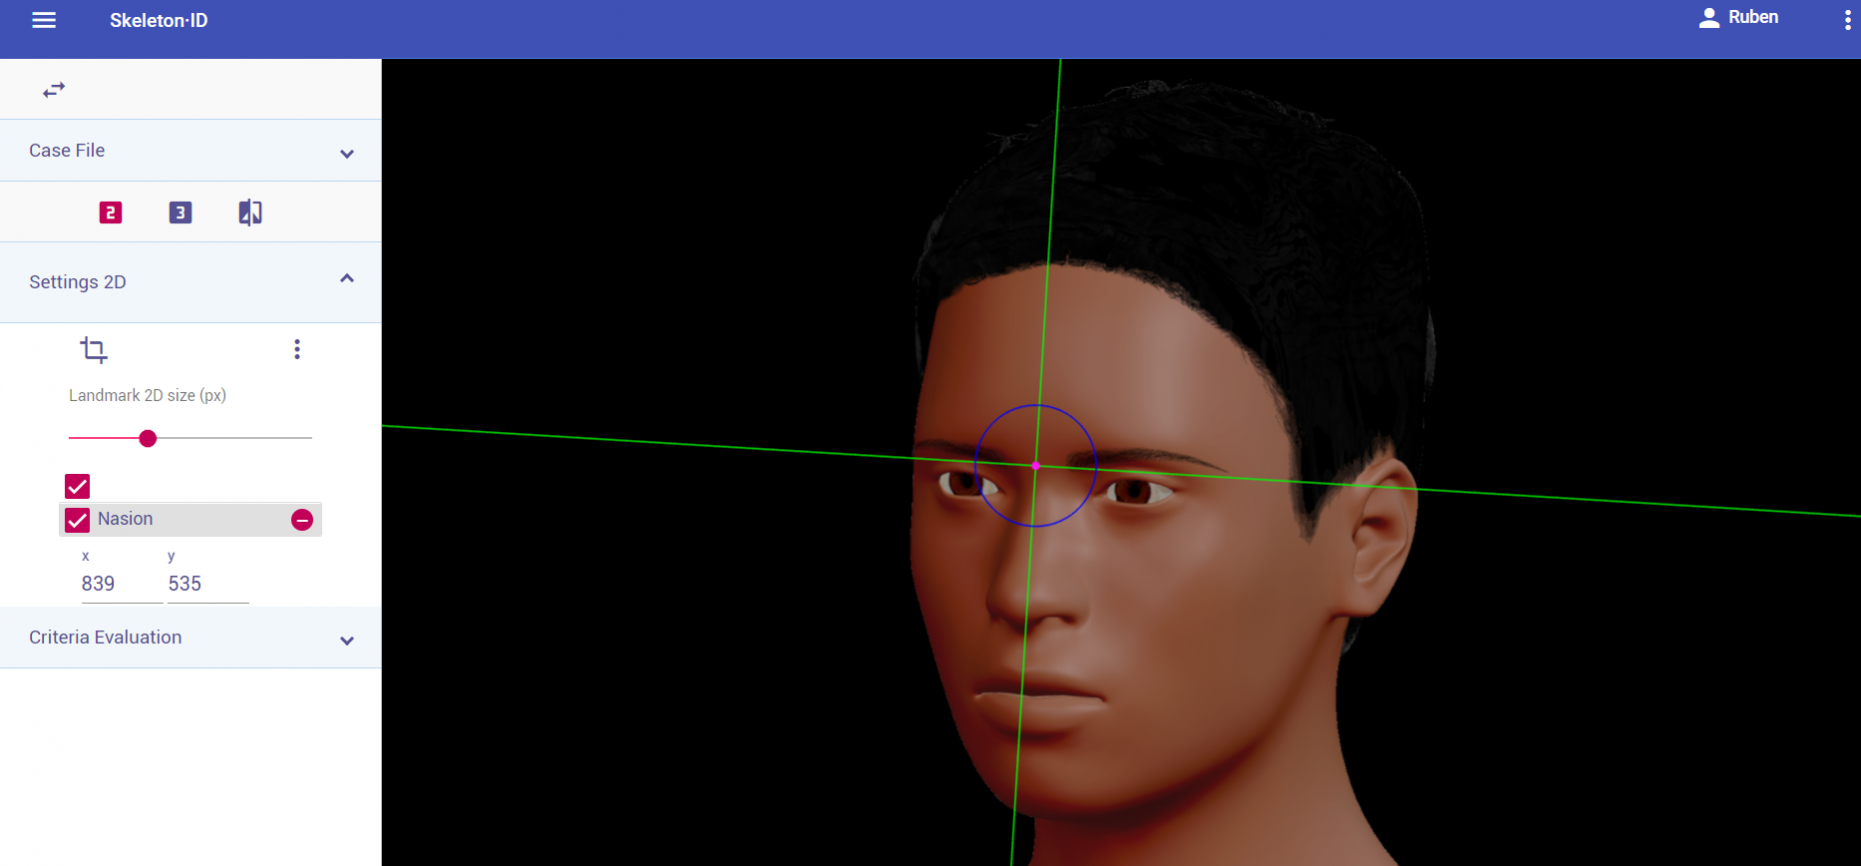 Figure 19. Nasion in oblique view. General shot of the image.
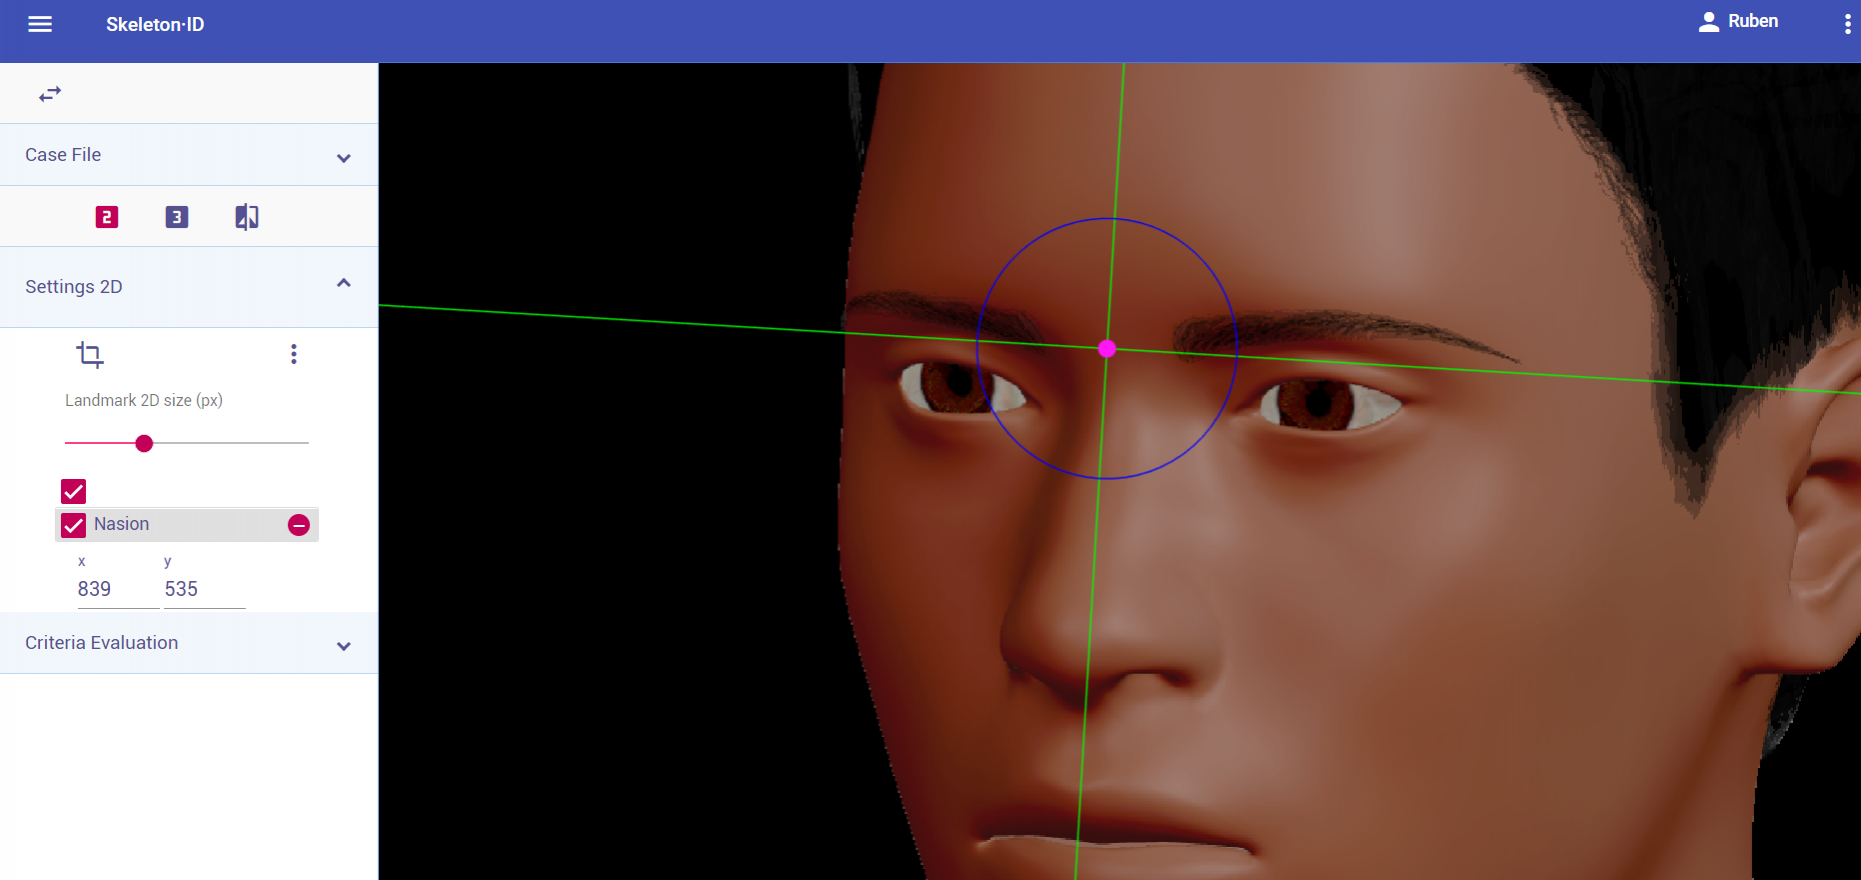 Figure 20. Nasion in oblique view. Approximation in the image.
Observations:
- According to interobserver studies (Campomanes-Álvarez et al., 2015), nasion can be accurately placed with high frequency (80%) in facial images regardless of the view (frontal, lateral or oblique).
- Note that in frontal view images it will be necessary to determine the sagittal plane using the vertical reference line.
- Avoid marking in subjects wearing occlusive objects such as glasses.
Photographic examples:

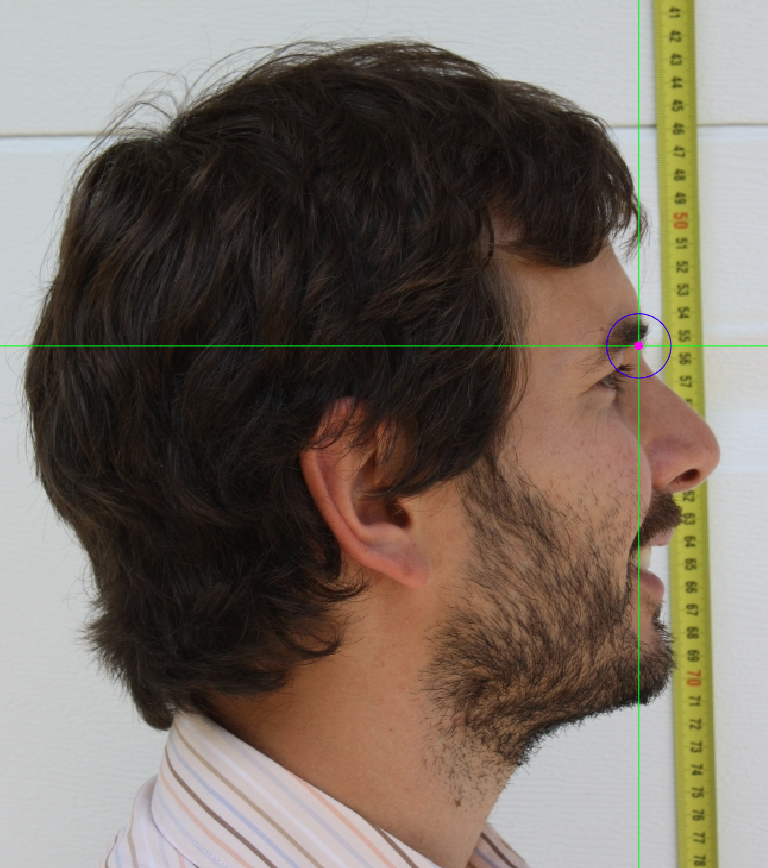
 Figure 21. Nasion marking on a photograph in frontal view (left), lateral view (center) and oblique view (right).
Subnasale
Abbreviature: sn´
Laterality: Medial
Type: 1
Standardized definition (Caple y Stephan, 2015): Median point at the junction between the lower border of the nasal septum and the philtrum area.
Approximation in the image: Zoom in on the lower half of the face.
Anatomical reference areas: Base of the columella.
Guidelines for Skeleton·ID frontal view marking:
Place subnasale in the base of the columella in frontal view. The horizontal auxiliary line should be placed in the lowermost region of the nasal base, in contact with the columella. Next, the vertical auxiliary line should be placed in the mid-section of the columella (point of maximum curvature).
 Figure 22. Subnasale in frontal view. General shot of the image.
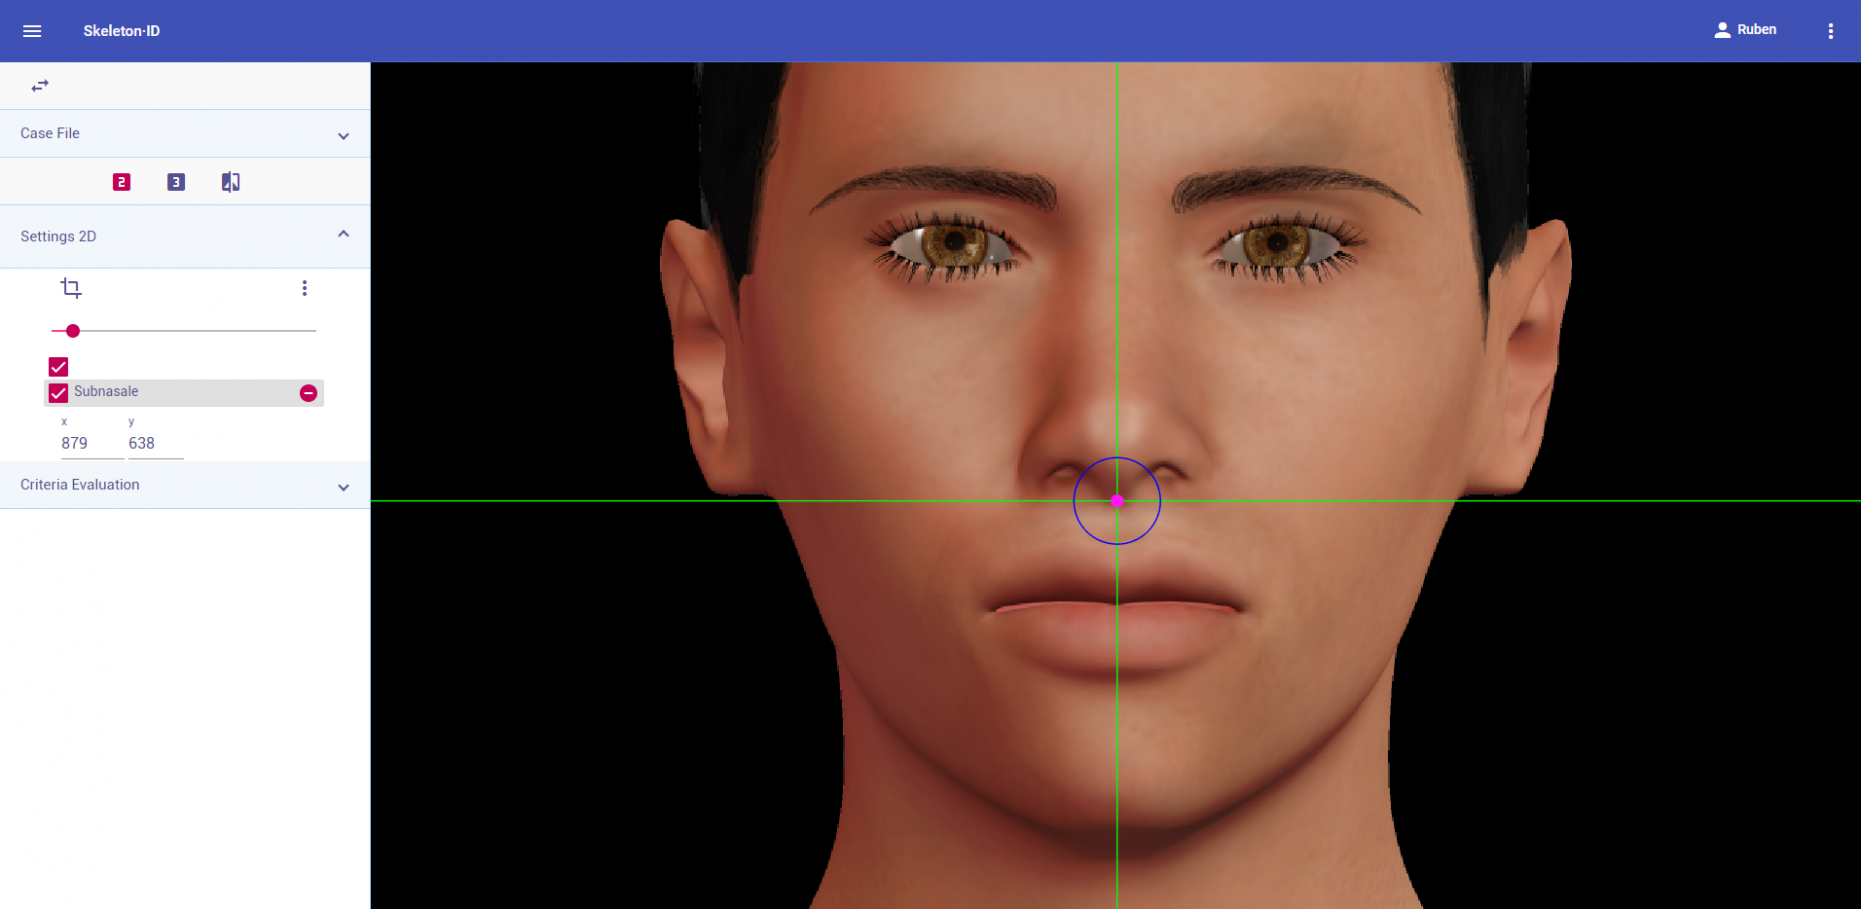 Figure 23. Subnasale in frontal view. Approximation in the image.
Guidelines for Skeleton·ID lateral view marking:
Place subnasale in the most anterior point of the angle of the junction of the nasal septum and the philtrum. First, place the horizontal auxiliary line at the height of this junction ant then move the vertical line to the deepest point of the curve at the nasal base.
 Figure 24. Subnasale in lateral view. General shot of the image.
 Figure 25. Subnasale in lateral view. Approximation in the image.
Guidelines for Skeleton·ID oblique view marking:
Place subnasale at the base of the columella in oblique view. The horizontal auxiliary line should be placed in the lowermost region of the nasal base, in contact with the columella, and the vertical auxiliary line should be in the mid plane of the philtrum.
 Figure 26. Subnasale in oblique view. General shot of the image.
 Figure 27. Subnasale in oblique view. Approximation in the image.
Observations:
- According to interobserver studies (Campomanes-Álvarez et al., 2015), subnasale can be accurately placed with high frequency (80%) in facial images regardless of the view (frontal, lateral or oblique).
- Mark in the inferior border of the nasal projection when the base of the columella is not visible. Note that the more projected the nasal tip, the more substantial the error will be.
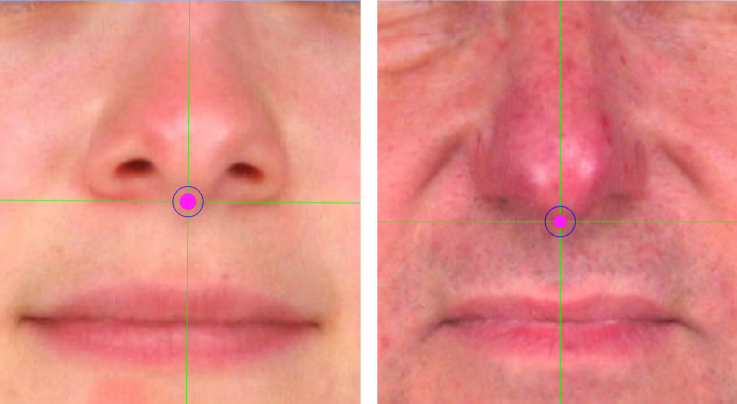 Figure 28. Marking of subnasale in a visible columella (left) and estimation of subnasale in the inferior border of the nasal projection (right).
Photographic examples:
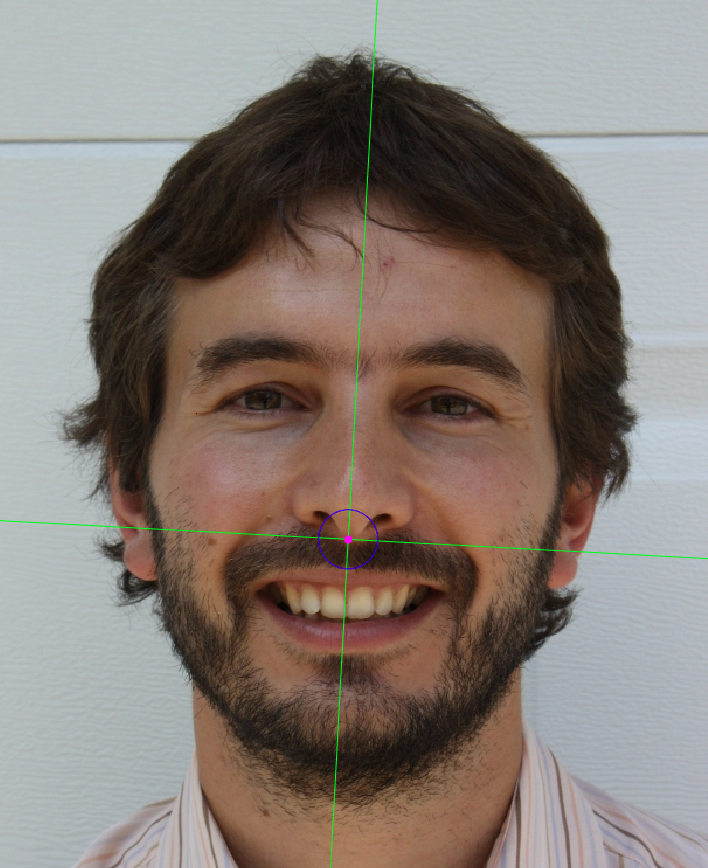
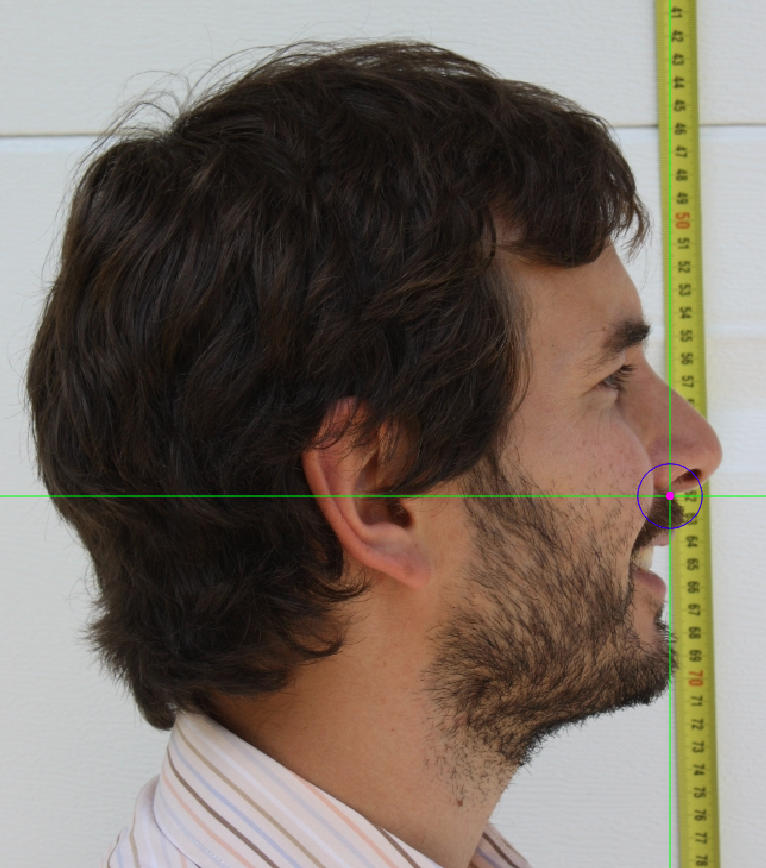
 Figure 29. Subnasale marking on a photograph in frontal view (left), lateral view (center) and oblique view (right).
Labiale superius
Abbreviature: ls´
Laterality: Medial
Type: 2
Standardized definition (Caple y Stephan, 2015): Midpoint of the vermillion border of the upper lip.
Approximation in the image: Zoom in on the lower half of the face.
Anatomical reference areas: Vermillion border of the upper lip and Cupid’s bow.
Guidelines for Skeleton·ID frontal view marking:
Place labiale superius in the superior edge of the vermillion border of the upper lip (transition line at the intersection of the lip and the adjacent skin), in the vertex of the Cupid’s bow (middle region of the upper lip) in frontal view. The horizontal auxiliary line should be placed on the border of the deepest point of the Cupid’s bow and the vertical line in the midpoint of the vermillion border of the upper lip.
 Figure 30. Labiale superius in frontal view. General shot of the image.
 Figure 31. Labiale superius in frontal view. Approximation in the image.
Guidelines for Skeleton·ID lateral view marking:
Place labiale superius over the most anterior point at the superior margin of the vermillion border of the upper lip. The horizontal line should be placed over the vermillion border of the upper lip and the vertical line on the most anterior point at the vermillion border.
 Figure 32. Labiale superius in lateral view. General shot of the image.
 Figure 33. Labiale superius in lateral view. Approximation in the image.
Guidelines for Skeleton·ID oblique view marking:
Place labiale superius in the superior edge of the vermillion border of the upper lip (transition line at the intersection of the lip and the adjacent skin), in the vertex of the Cupid’s bow (middle region of the upper lip) in oblique view. The horizontal line should be placed over the border, at the vertex of the Cupid’s bow, and the vertical line in the midpoint of the vermillion border.
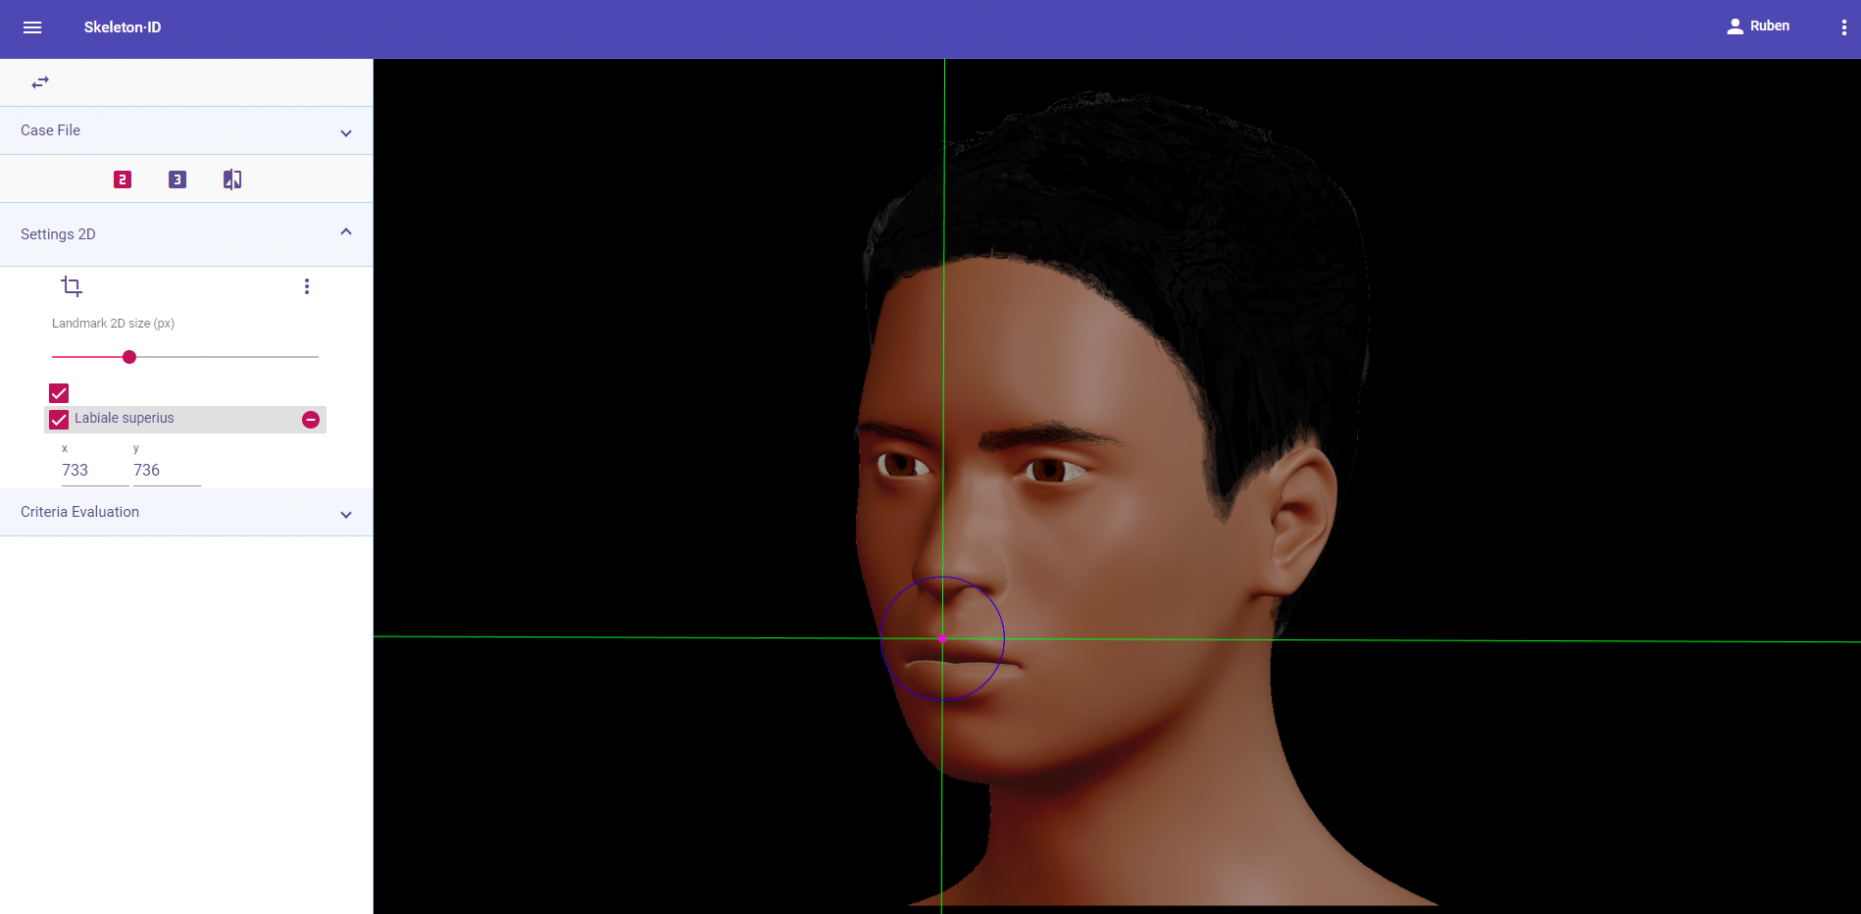 Figure 34. Labiale superius in oblique view. General shot of the image.
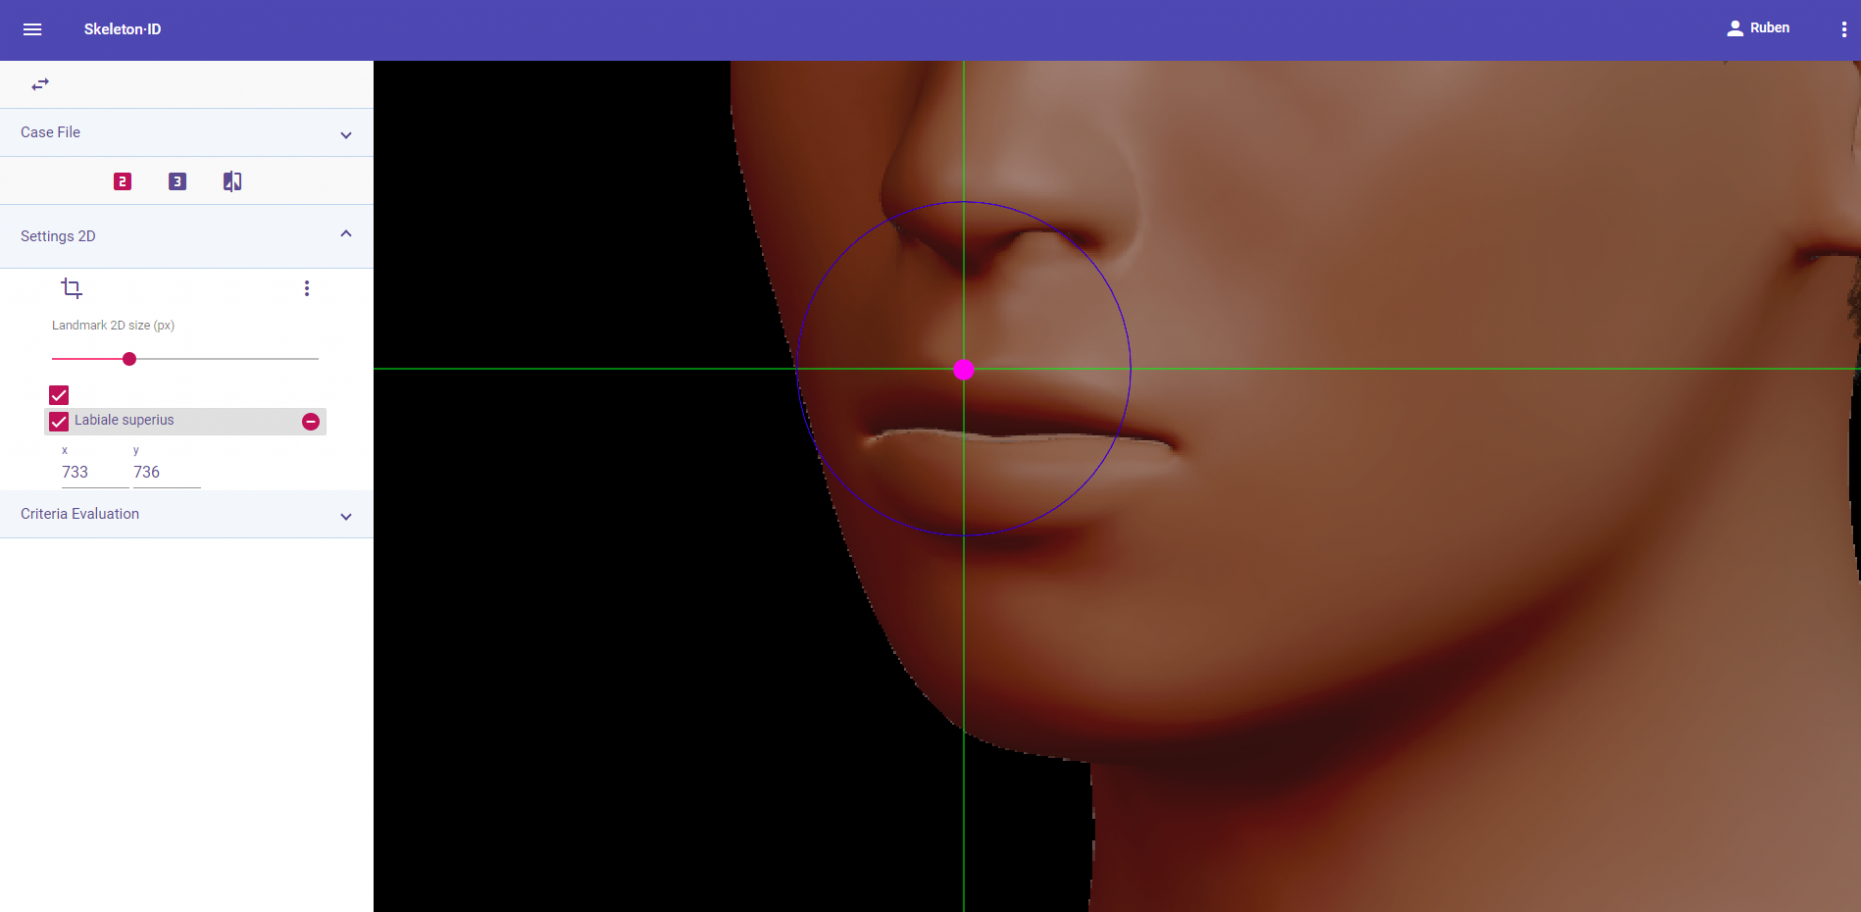 Figure 35. Labiale superius in oblique view. Approximation in the image.
Observations:
- According to interobserver studies (Campomanes-Álvarez et al., 2015), labiale superius can be accurately placed with high frequency (80%) in facial images regardless of the view (frontal, lateral or oblique).
- In the absence of a Cupid’s bow (primary reference), the labial middle line may be used as a reference.
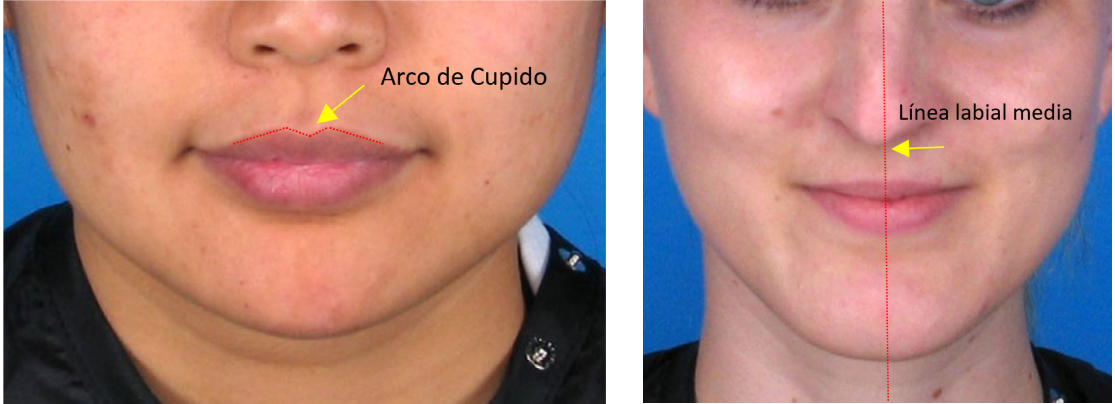 Figure 36. Example of upper lip with Cupid’s bow (left). Reference for the labial middle line to estimate labiale superius in an upper lip where the Cupid’s bow is absent (right).
- Avoid marking this point in subjects with thick facial hair.
 Figure 37. Subject with a thick beard that obscures the view of the Cupid’s bow.
Photographic examples:
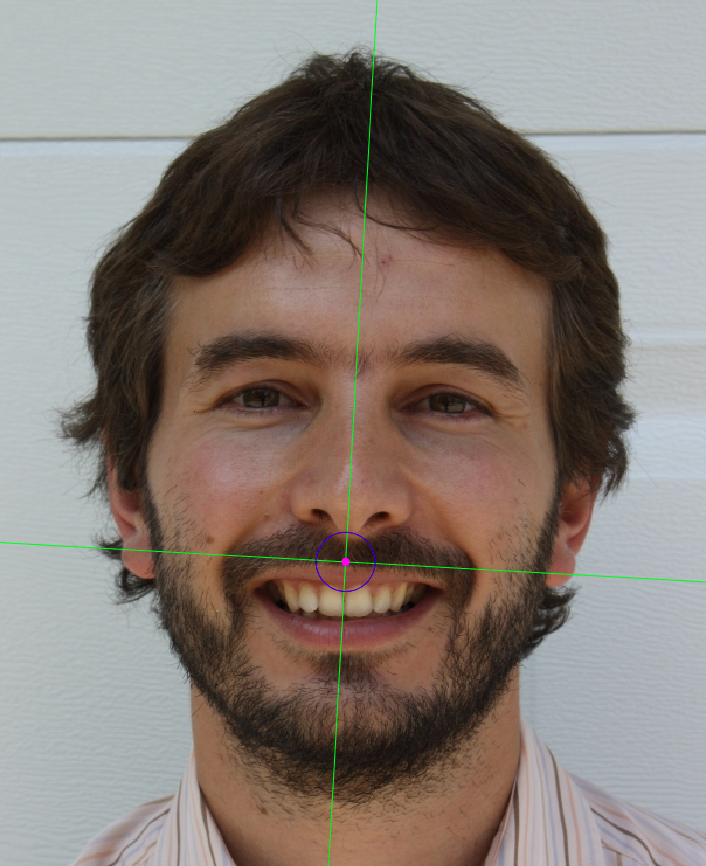

 Figure 38. Labiale superius marking on a photograph in frontal view (left), lateral view (center) and oblique view (right).
Stomion
Abbreviature: sto´
Laterality: Medial
Type: 2
Standardized definition (Caple y Stephan, 2015): Midline point of the labial fissure when the lips are closed naturally, with teeth shut in the natural position; if not in the midline, then below the philtrum.
Approximation in the image: Zoom in on the lower half of the face.
Anatomical reference areas: Labial fissure.
Guidelines for Skeleton·ID frontal view marking:
Place stomion in the labial fissure, in the midline when they are naturally closed in frontal view. The horizontal auxiliary line should be placed in the labial fissure, and the vertical auxiliary line in the midsagittal line.
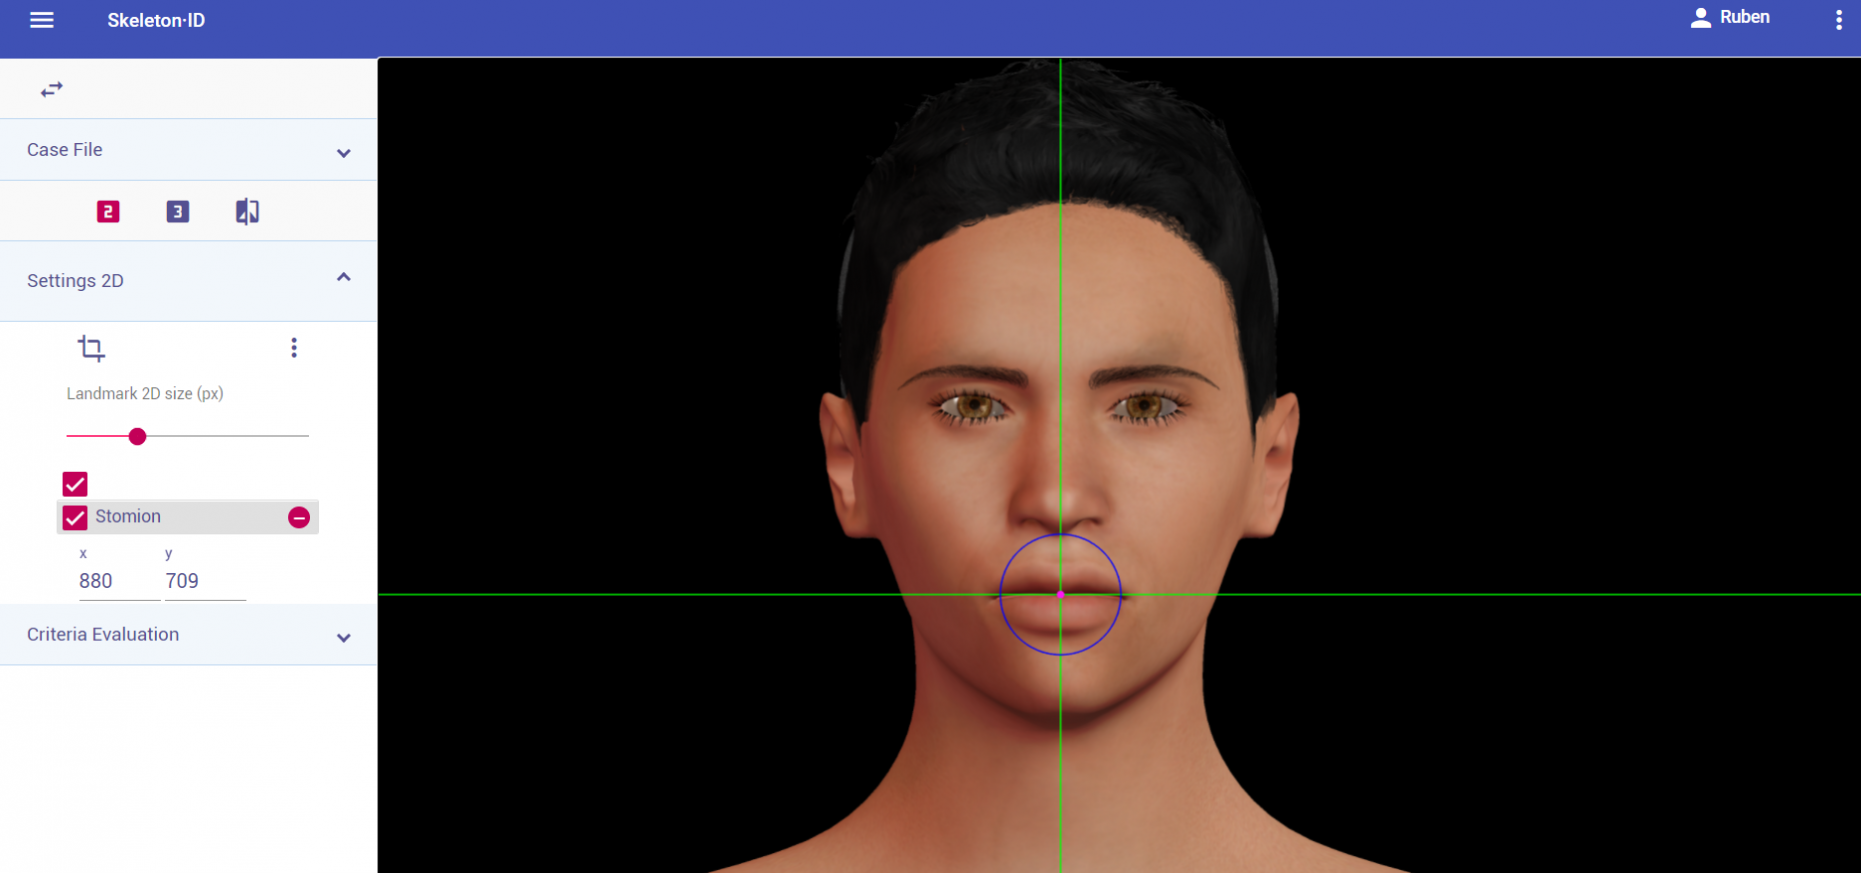 Figure 39. Stomion in frontal view. General shot of the image.
 Figure 40. Stomion in frontal view. Approximation in the image.
Guidelines for Skeleton·ID lateral view marking:
Place stomion on the most anterior point of the labial fissure, where the bodies of the upper and lower lip meet in lateral view. The horizontal line should be placed on the labial fissure, and the vertical line on the most anterior point of the border, where the lips touch.
 Figure 41. Stomion in lateral view. General shot of the image.
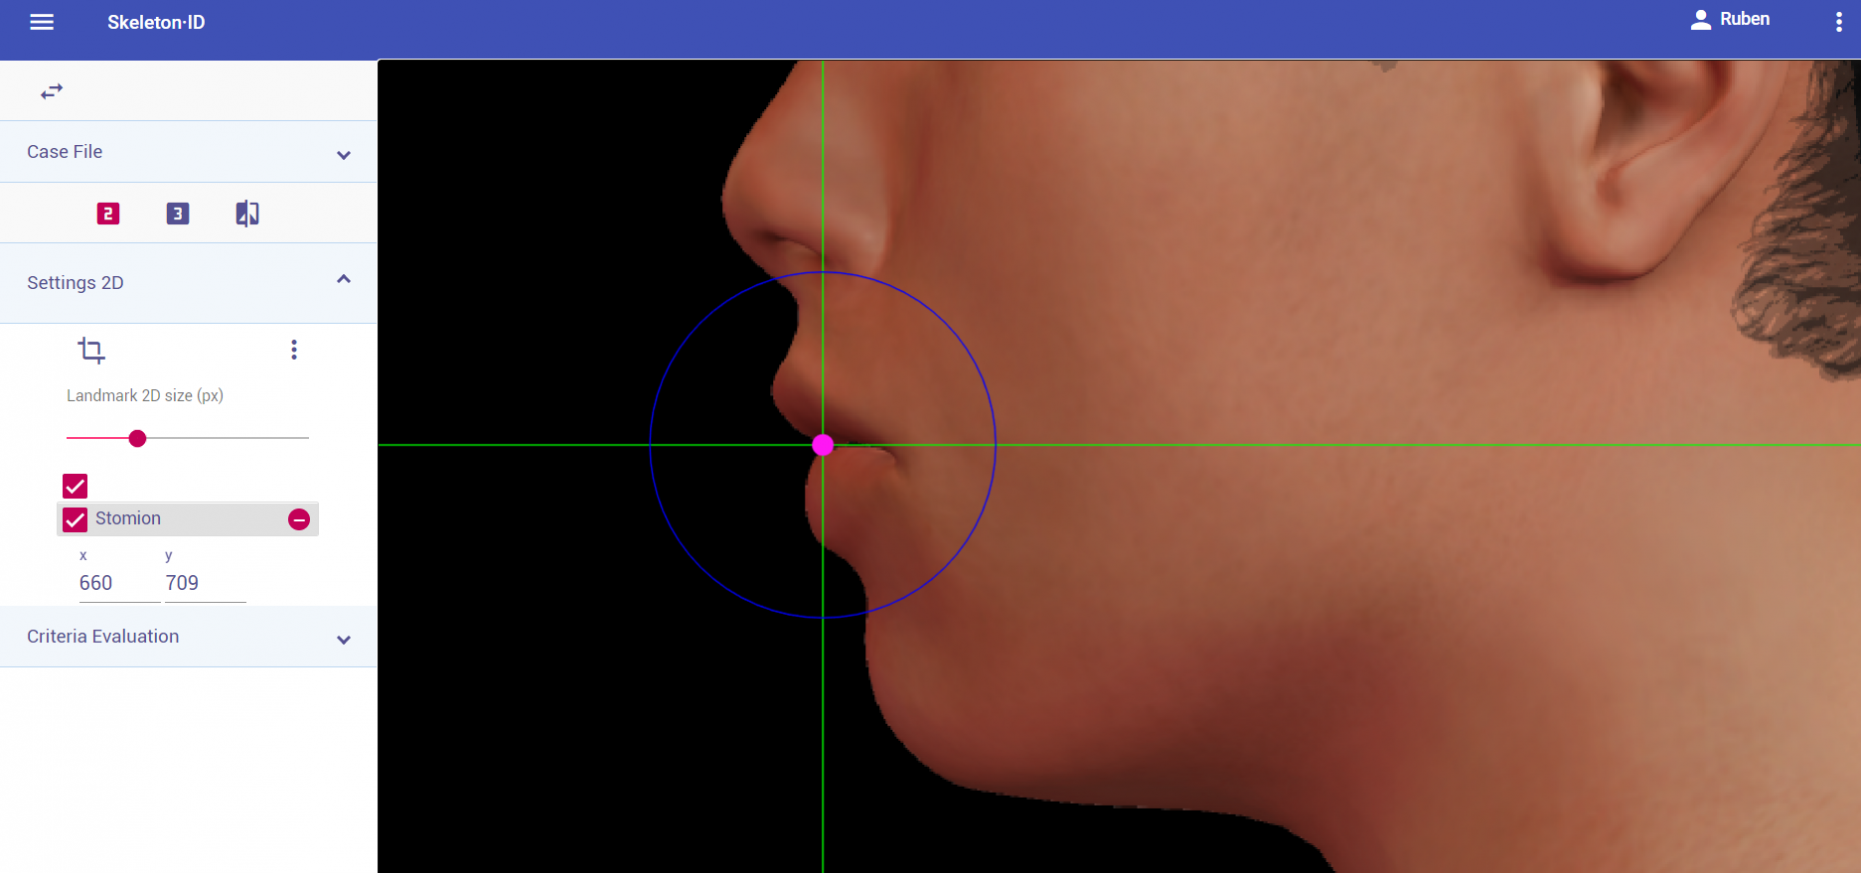 Figure 42. Stomion in lateral view. Approximation in the image.
Guidelines for Skeleton·ID oblique view marking:
Place stomion on the labial fissure, in the midline point when they are closed naturally in oblique view. The horizontal line should be on the labial fissure, and the vertical line on the midpoint of the lips. Note that it may be necessary to rotate the vertical line in order to mark the labial middle line.
 Figure 43. Stomion in oblique view. General shot of the image.
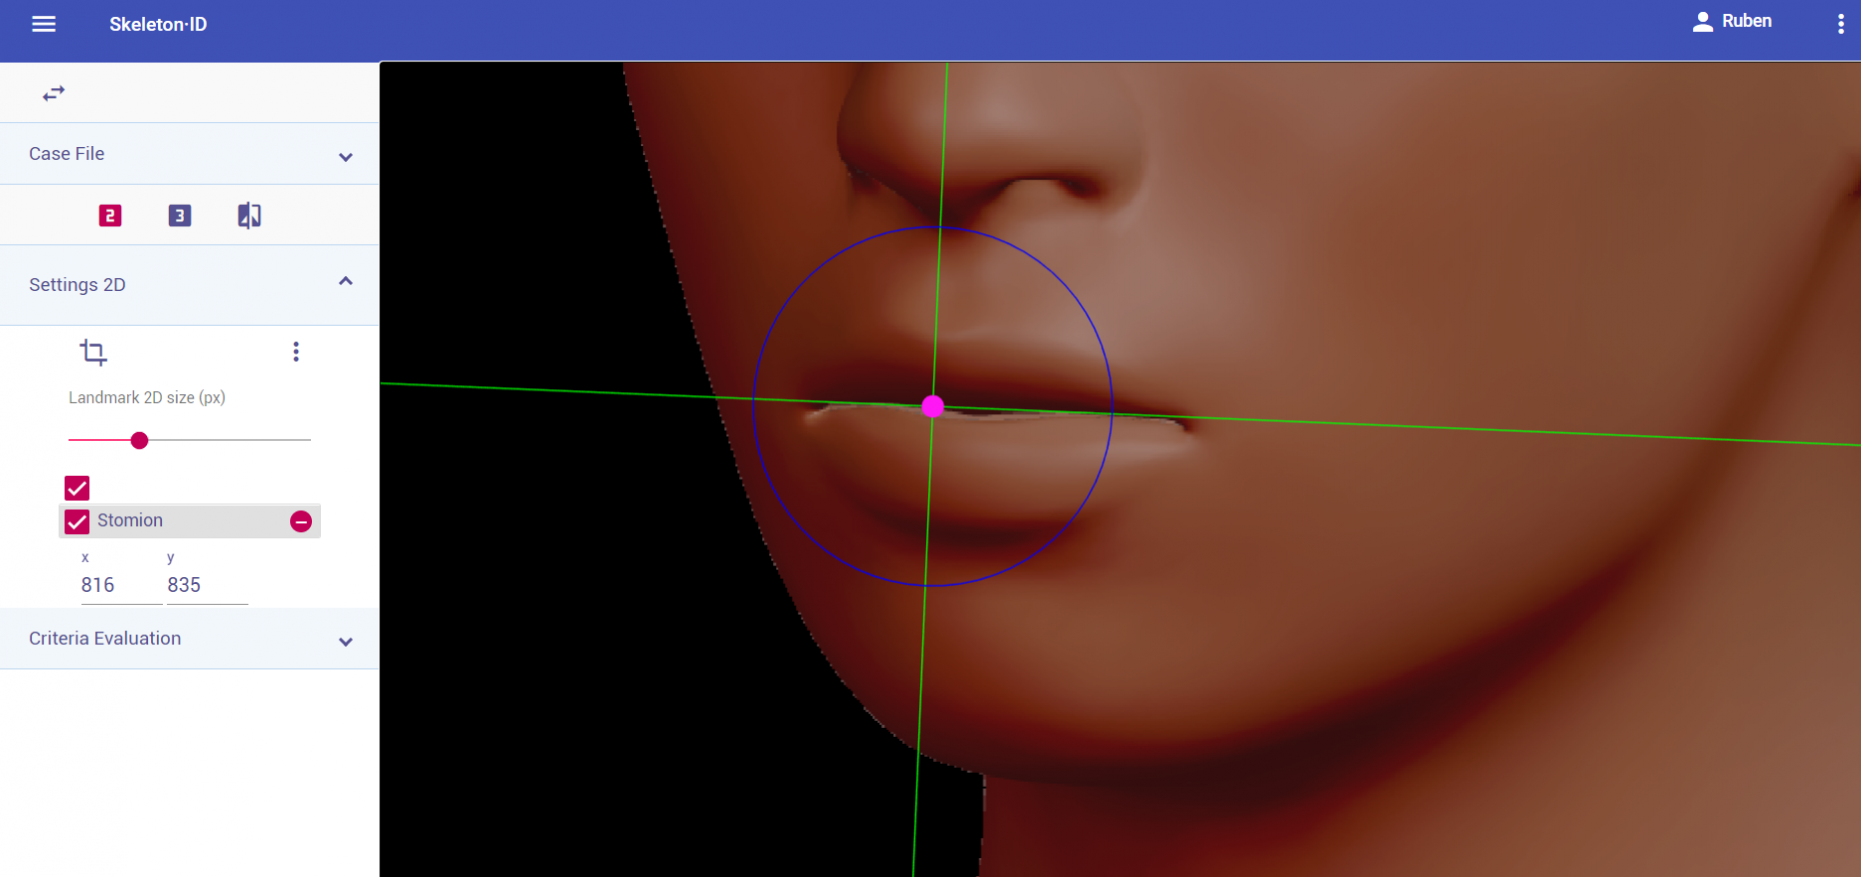 Figure 44. Stomion in oblique view. Approximation in the image.
Observations:
- According to Cummaudo et al. (2013) inter and intraobserver studies, the dispersion of stomion is at its lowest in frontal view images.
- When the lips are not naturally closed and the labial fissure cannot be observed in frontal view, as long as the upper central incisors are visible, stomion may be placed in the oclusal surface at their most inferior interdental contact point.
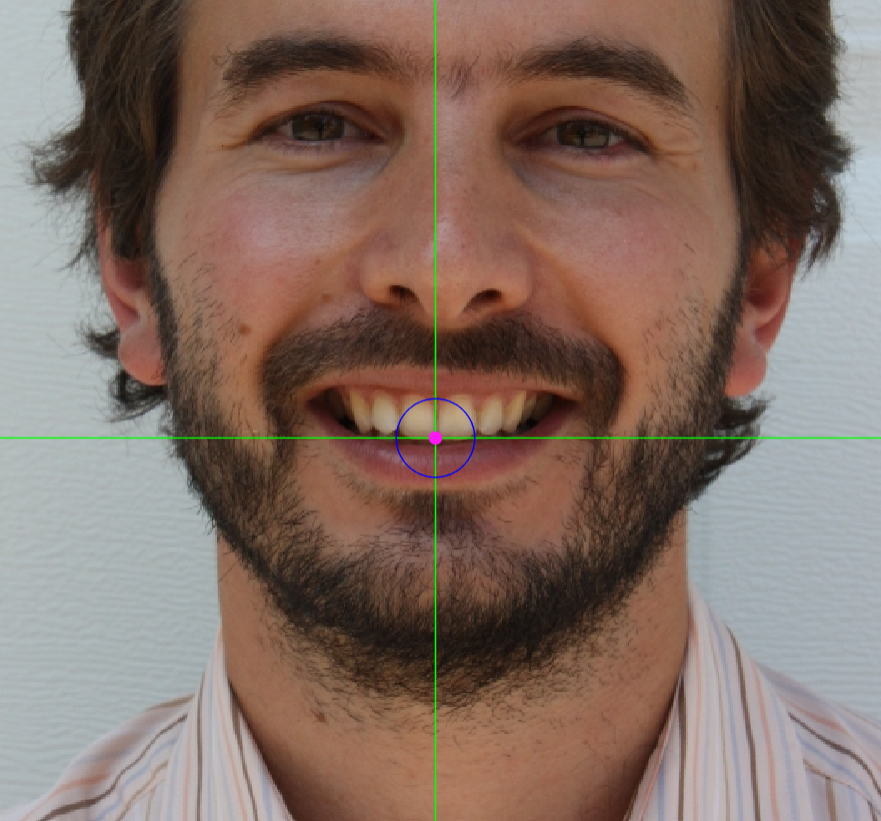 Figure 45. Stomion marking in the occlusal surface at the most inferior interdental contact point when the mouth is not shut in natural pose.
Photographic examples:
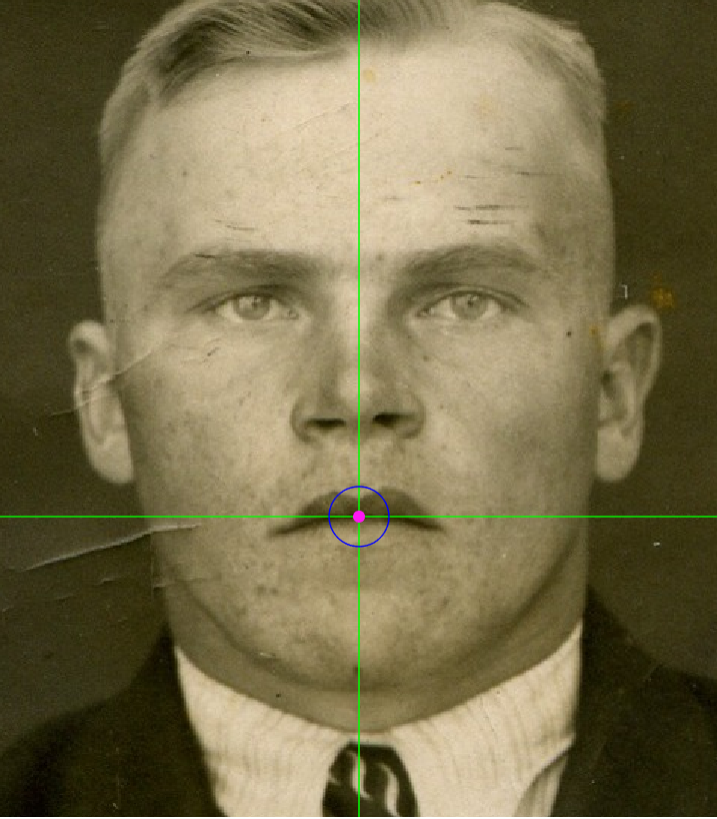
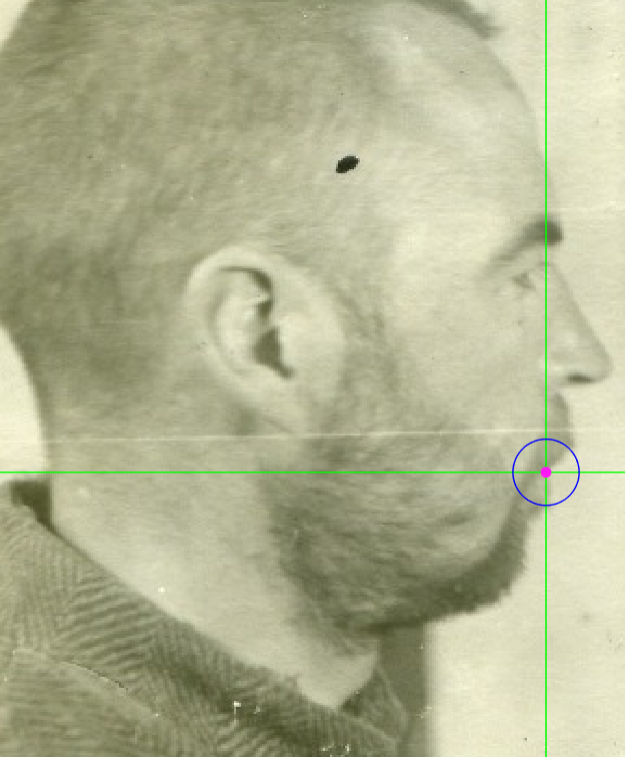
 Figure 46. Stomion marking on a photograph in frontal view (left), lateral view (center) and oblique view (right).
Labiale inferius
Abbreviature: li´
Laterality: Medial
Type: 2
Standardized definition (Caple y Stephan, 2015): Midpoint of the vermilion border of the lower lip.
Approximation in the image: Zoom in on the lower half of the face.
Anatomical reference areas: Vermillion border of the lower lip.
Guidelines for Skeleton·ID frontal view marking:
Place labiale inferius on the edge of the vermillion border of the lower lip (transition line at the intersection of the lip and the adjacent skin) and on the intersection with the labial middle line in frontal view. The horizontal auxiliary line should be placed in the inferior edge of the vermillion border of the lower lip and the vertical line in the labial middle line.
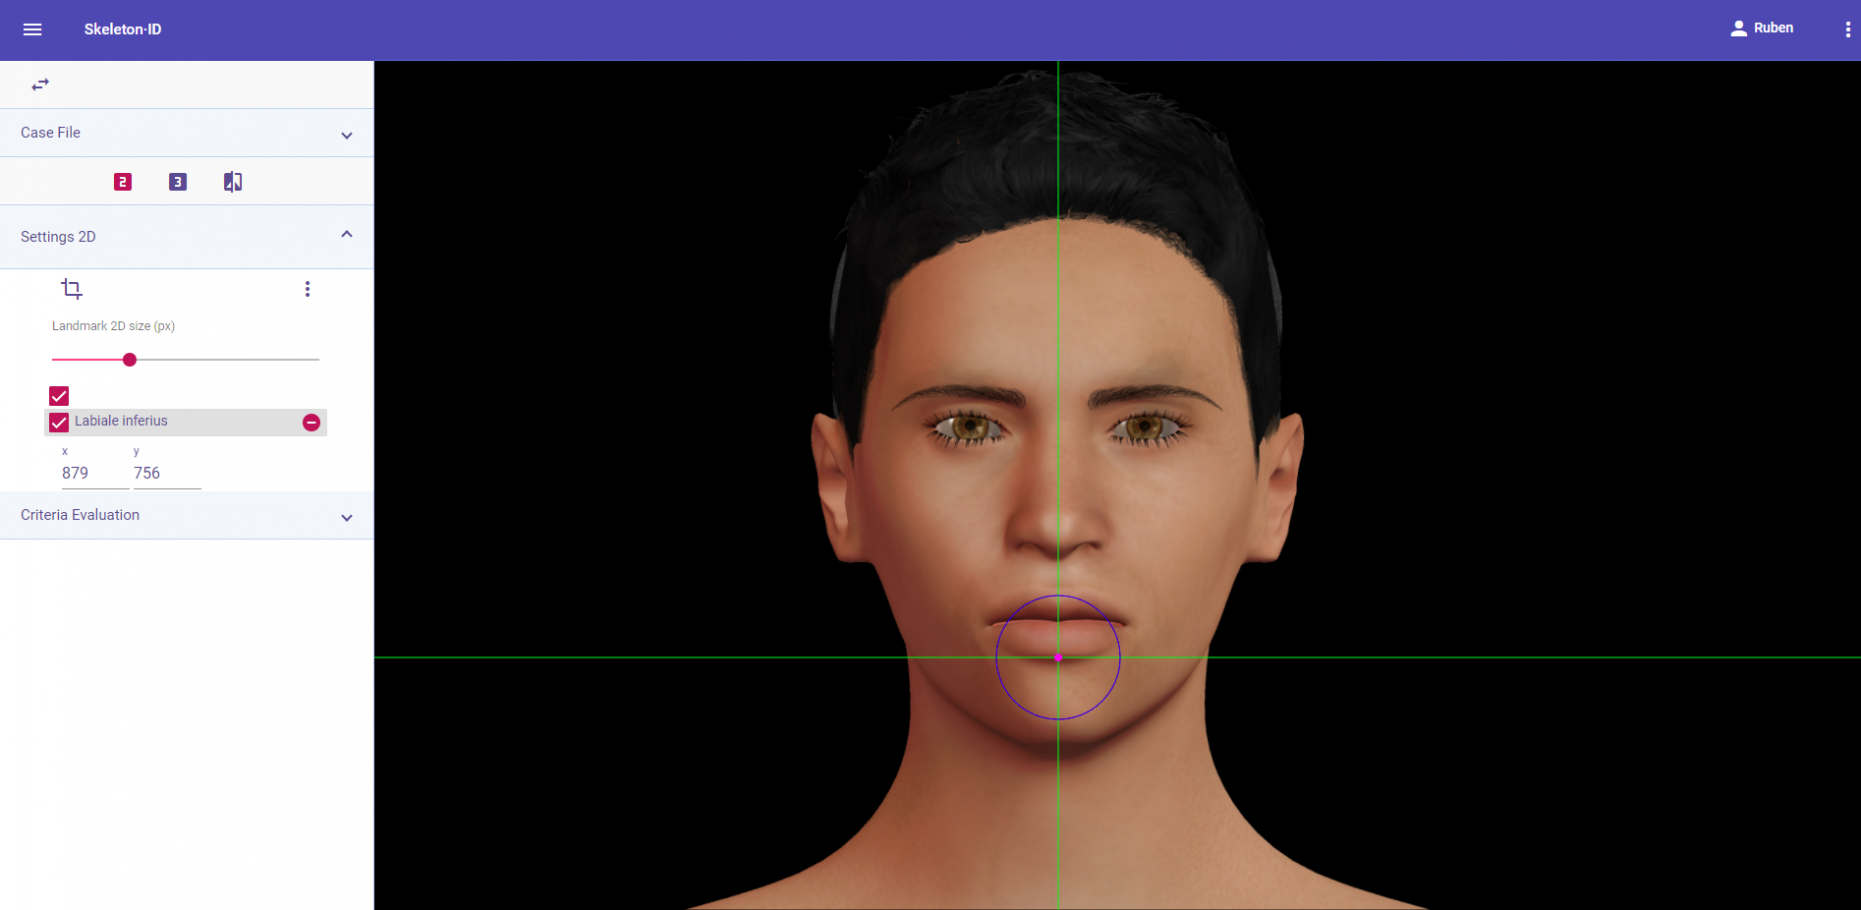 Figure 47. Labiale inferius in frontal view. General shot of the image.
 Figure 48. Labiale inferius in frontal view. Approximation in the image.
Guidelines for Skeleton·ID lateral view marking:
Place labiale inferius on the most anterior point at the edge of the vermillion border of the lower lip The horizontal auxiliary line should be placed in the inferior edge of the vermillion border of the lower lip and the vertical line in the most anterior point of the vermillion border of the lower lip.
 Figure 49. Labiale inferius in lateral view. General shot of the image.
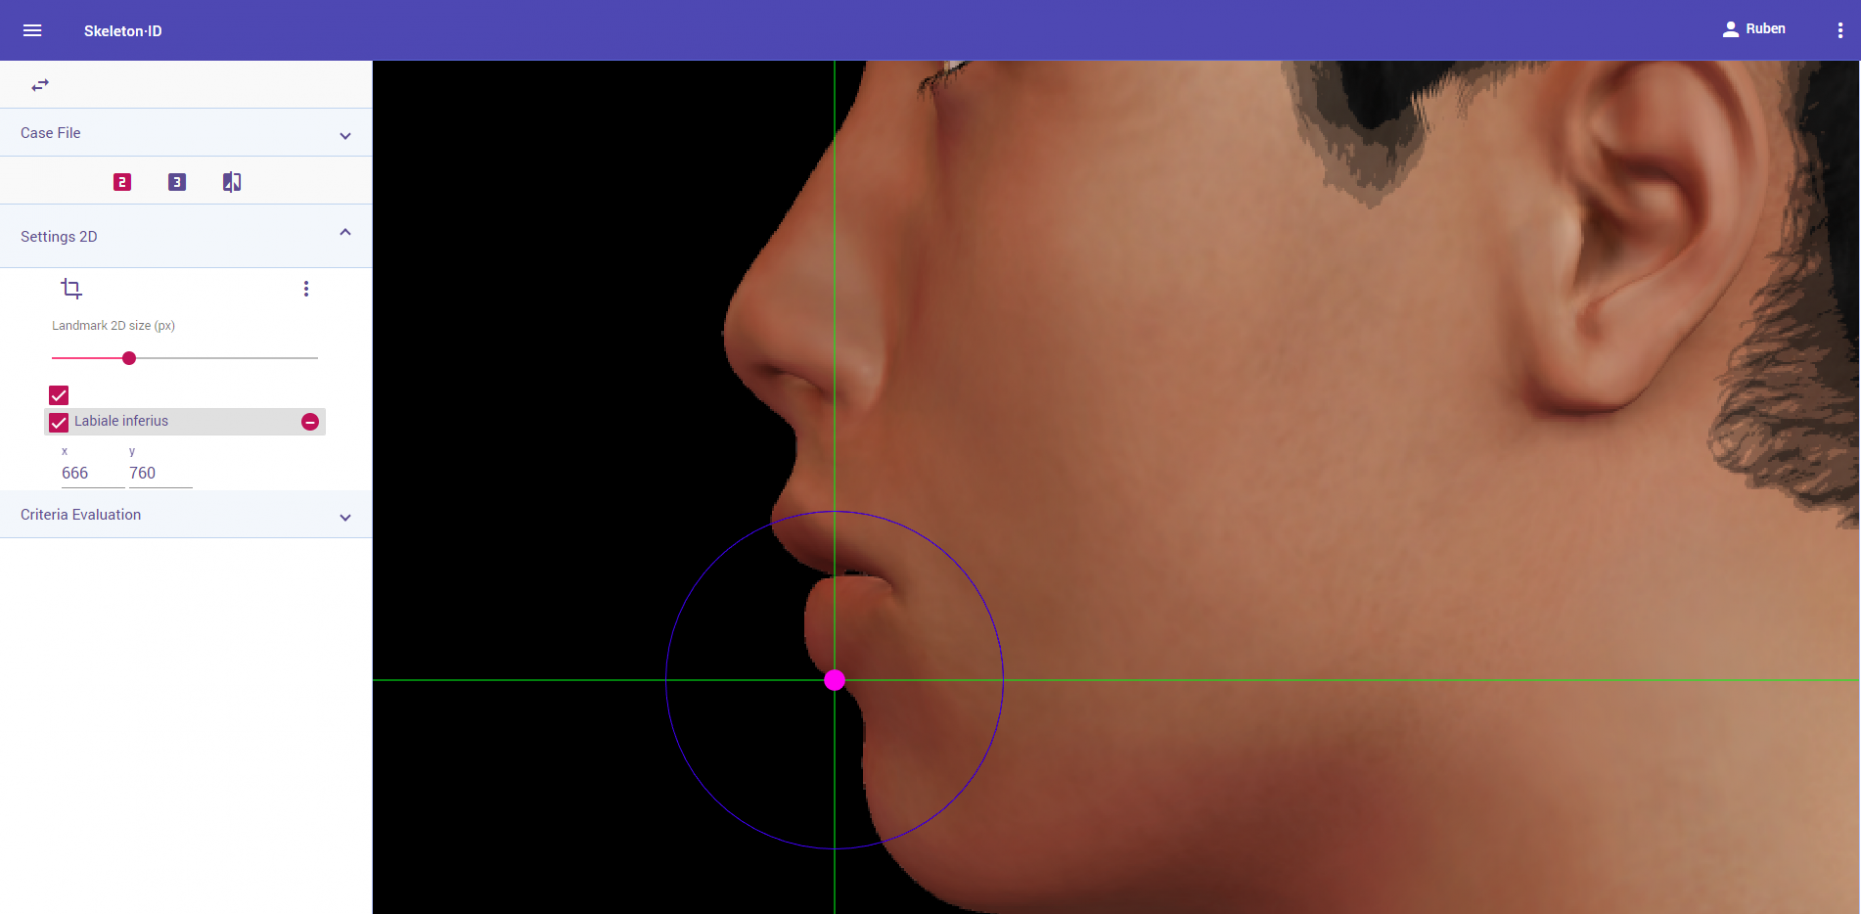 Figure 50. Labiale inferius in lateral view. Approximation in the image.
Guidelines for Skeleton·ID oblique view marking:
Place labiale inferius on the lower edge of the vermillion border of the lower lip (transition line at the intersection of the lip and the adjacent skin) and on the intersection with the labial middle line in oblique view. The horizontal auxiliary line should be placed in the inferior edge of the vermillion border of the lower lip and the vertical line in the labial middle line.
 Figure 51. Labiale inferius in oblique view. General shot of the image.
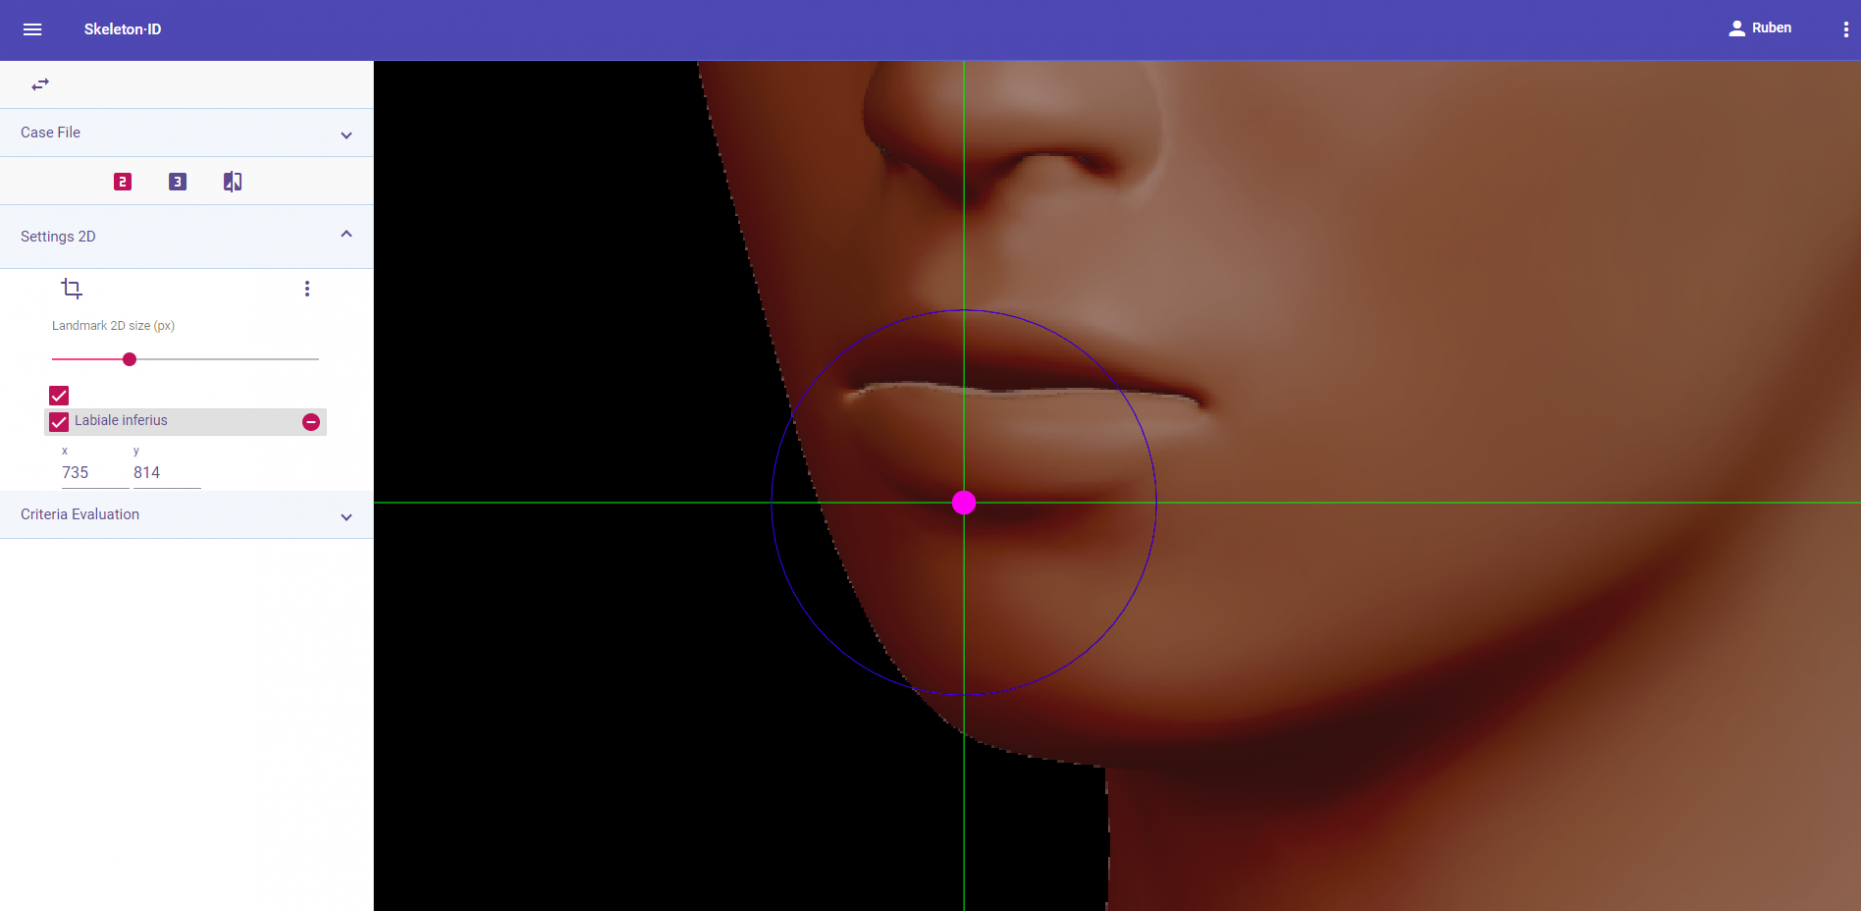 Figure 52. Labiale inferius in oblique view. Approximation in the image.
Observations:
- According to interobserver studies (Campomanes-Álvarez et al., 2015), labiale inferius can be accurately placed with less consistency (50%) in facial images regardless of the view (frontal, lateral or oblique).
Photographic examples:
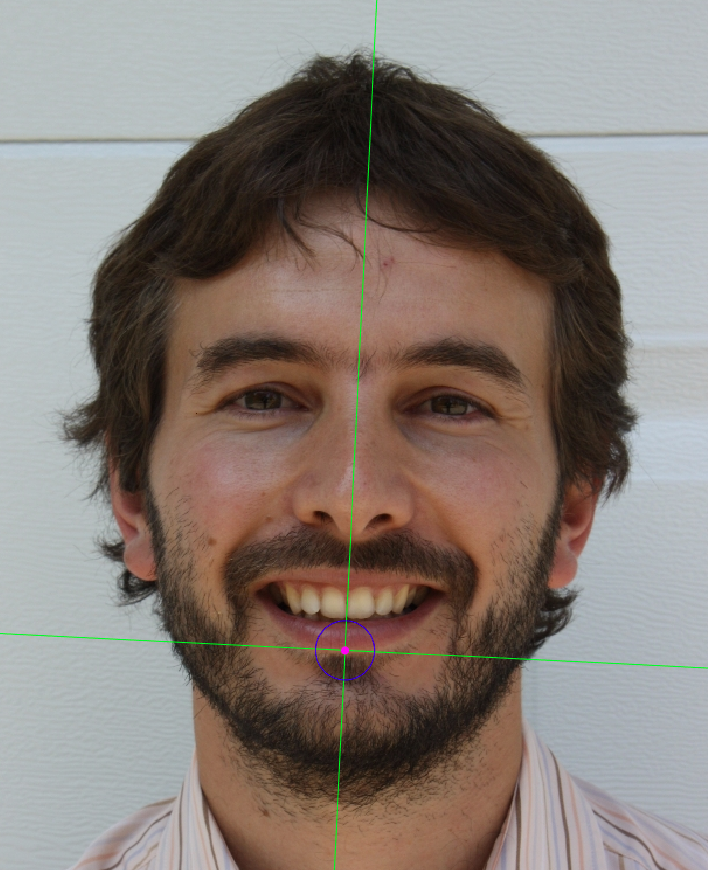
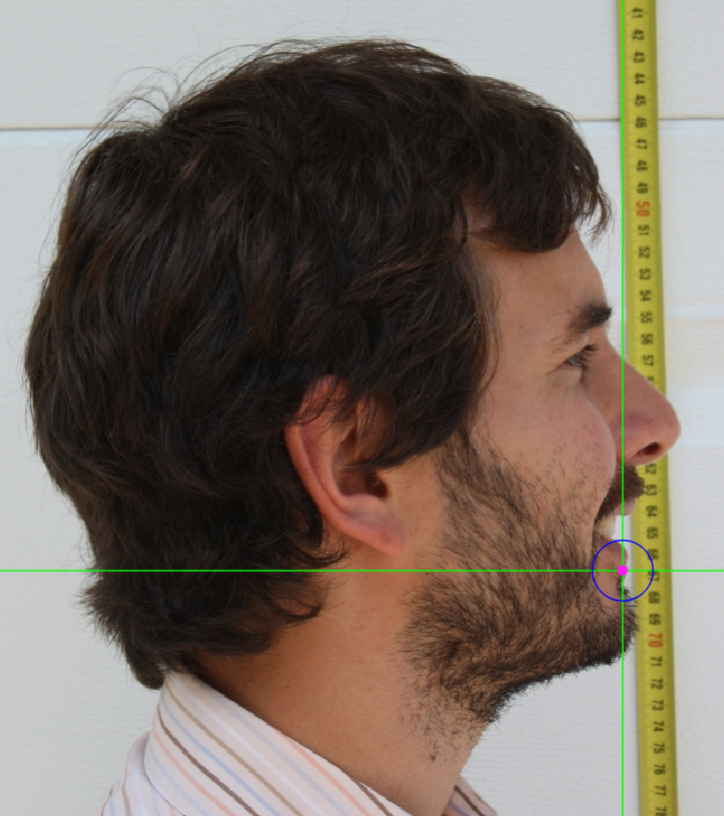
 Figure 53. Labiale inferius marking on a photograph in frontal view (left), lateral view (center) and oblique view (right).
Supramentale
Abbreviature: sm´
Laterality: Medial
Type: 2
Standardized definition (Caple y Stephan, 2015): Deepest midline point of the mentolabial sulcus.
Approximation in the image: Zoom in on the lower half of the face.
Anatomical reference areas: Mentolabial sulcus.
Guidelines for Skeleton·ID frontal view marking:
Place supramentale in the region between the lower lip and the chin, in the midline point of the mentolabial sulcus in frontal view. The horizontal auxiliary line should be placed on the midline point of the mentolabial sulcus and the vertical auxiliary line should be placed in the midsagittal plane of the chin.
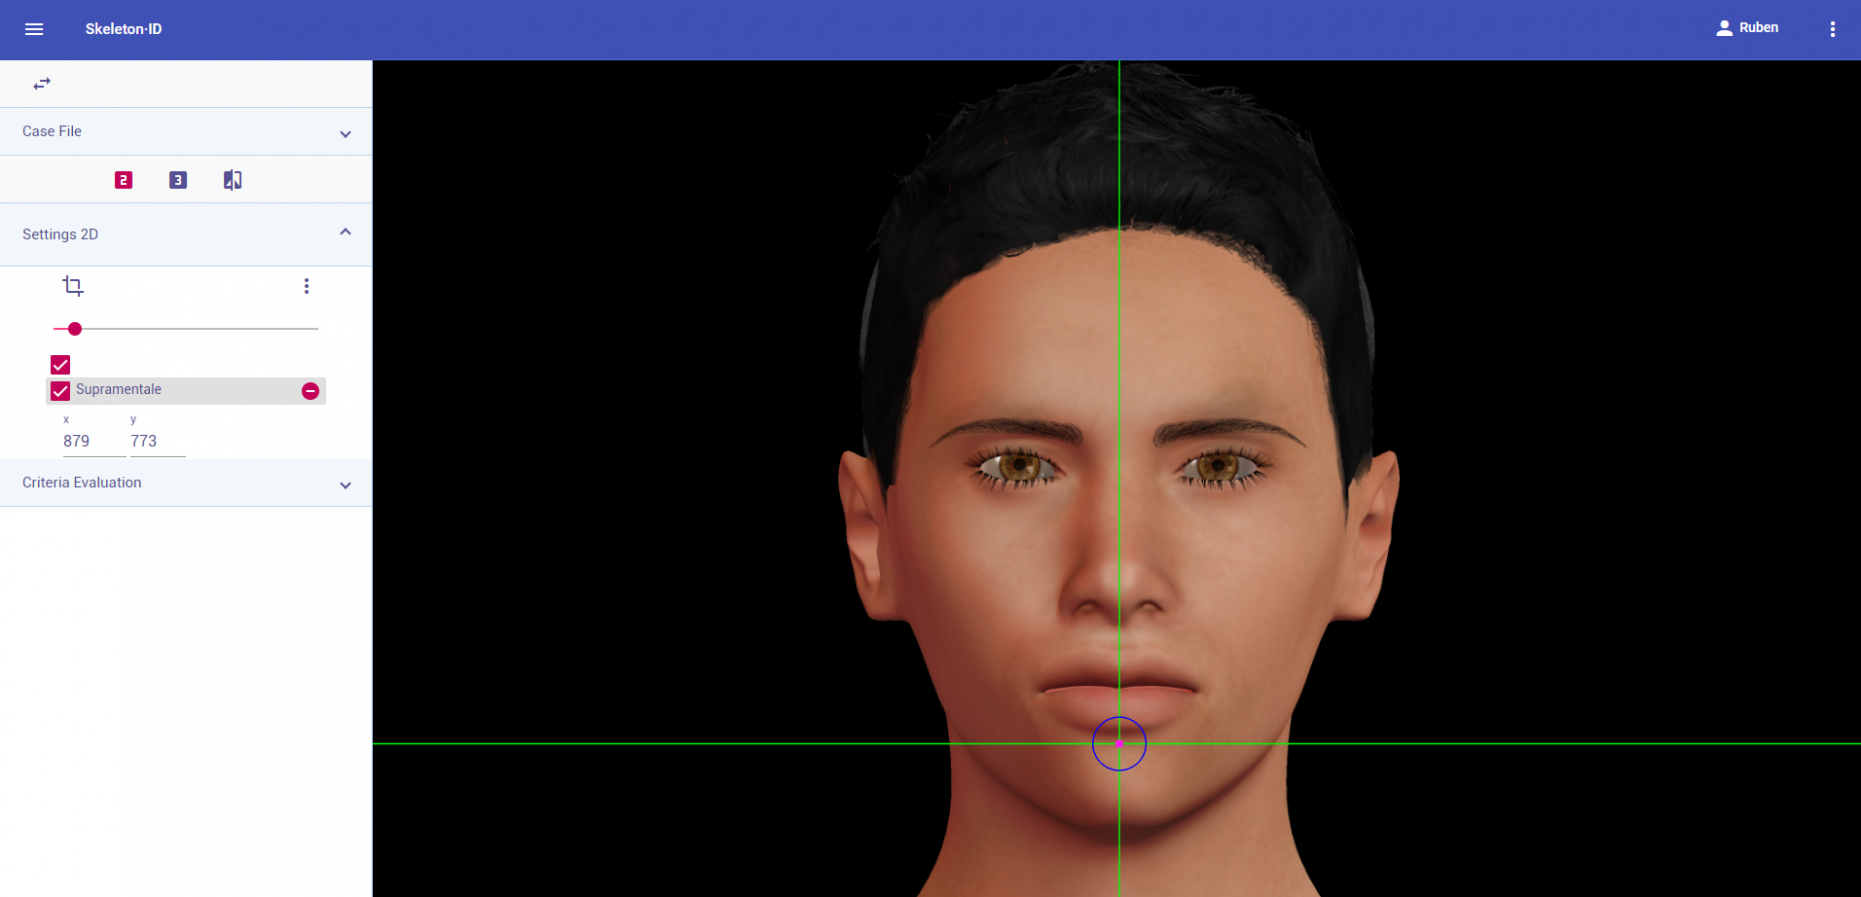 Figure 54. Supramentale in frontal view. General shot of the image.
 Figure 55. Supramentale in frontal view.Approximation in the image.
Guidelines for Skeleton·ID lateral view marking:
Place supramentale on the deepest point of the concavity between labiale inferius and pogonion in lateral view. The horizontal auxiliary line should be placed on the midline point of the mentolabial sulcus and the vertical line on the most anterior point of the sulcus.
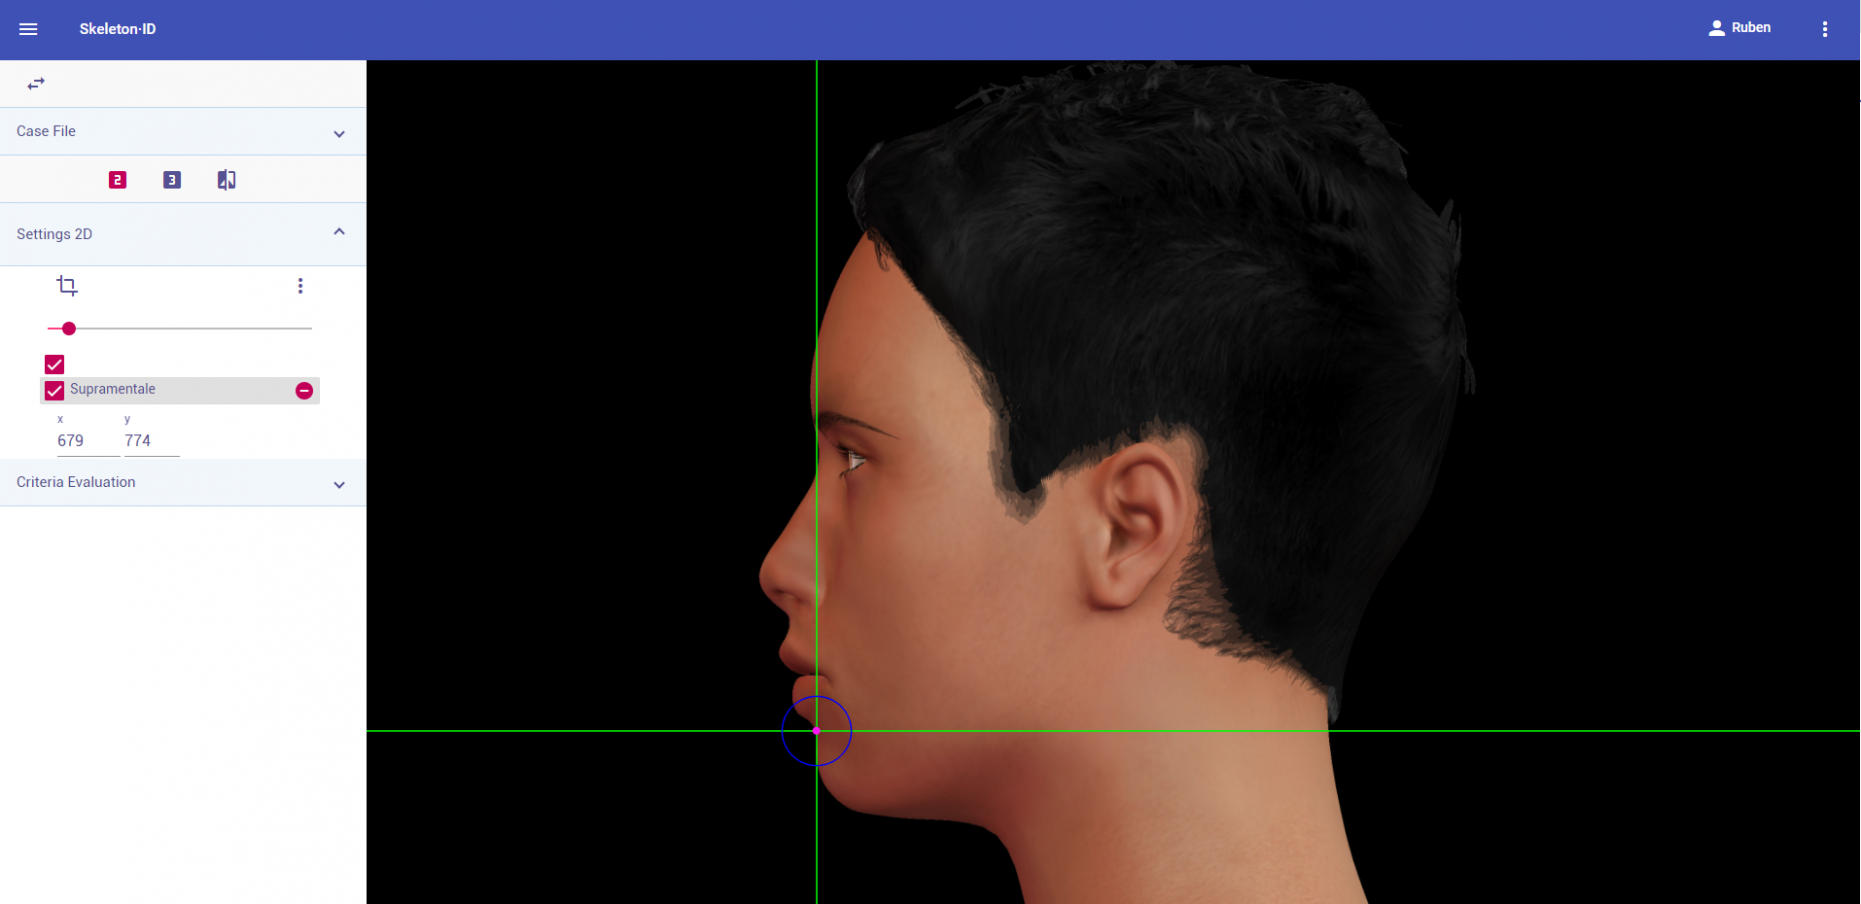 Figure 56. Supramentale in lateral view. General shot of the image.
 Figure 57. Supramentale in lateral view. Approximation in the image.
Guidelines for Skeleton·ID oblique view marking:
Place supramentale in the region between the lower lip and the chin, in the midline point of the mentolabial sulcus in oblique view. The horizontal auxiliary line should be placed in the midline point of the mentolabial sulcus and the vertical auxiliary line on the midsagittal plane of the chin.
 Figure 58. Surpamentale in oblique view. General shot of the image.
 Figure 59. Supramentale in oblique view. Approximation in the image.
Observations:
- Avoid marking this point in subjects with thick facial hair.
 Figure 60. Subject with a thick beard that obscures the view of the mentolabial sulcus.
Photographic examples:
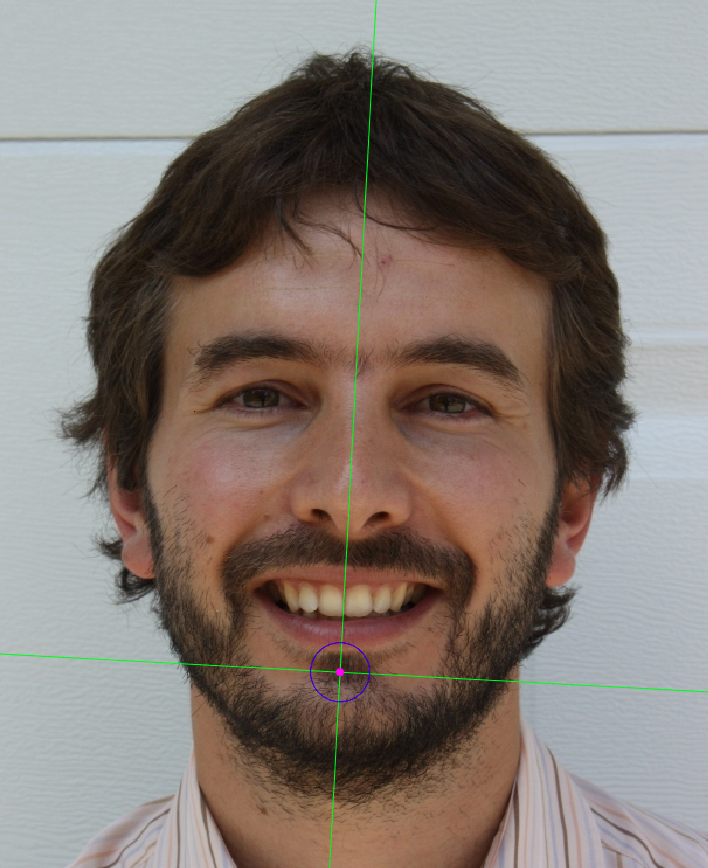

 Figure 60. Supramentale marking on a photograph in frontal view (left), lateral view (center) and oblique view (right).
Pogonion
Abbreviature: pg´
Laterality: Medial
Type: 3
Standardized definition (Caple y Stephan, 2015): Most anterior midpoint of the chin, located on the skin surface anterior to the identical bony landmark of the mandible.
Approximation in the image: Zoom in on the lower half of the face.
Anatomical reference areas: Inferior contour of the mental protuberance.
Guidelines for Skeleton·ID frontal view marking:
Place pogonion in the medial region of the mental protuberance, coinciding with the labial middle line in frontal view. The vertical auxiliary line should be placed in the midsagittal plane of the chin and the horizontal auxiliary line in the most prominent point of the chin. Note this point will be estimated and cannot be accurately located.
 Figure 61. Pogonion in frontal view. General shot of the image.
 Figure 62. Pogonion in frontal view. Approximation in the image.
Guidelines for Skeleton·ID lateral view marking:
Place pogonion in the most anterior point of the mental protuberance in lateral view. The vertical auxiliary line should be placed in the most anterior point of the curve of the mental protuberance and the horizontal auxiliary line at this height Note that it may be necessary to rotate the auxiliary lines’ axis in order to determine this point.
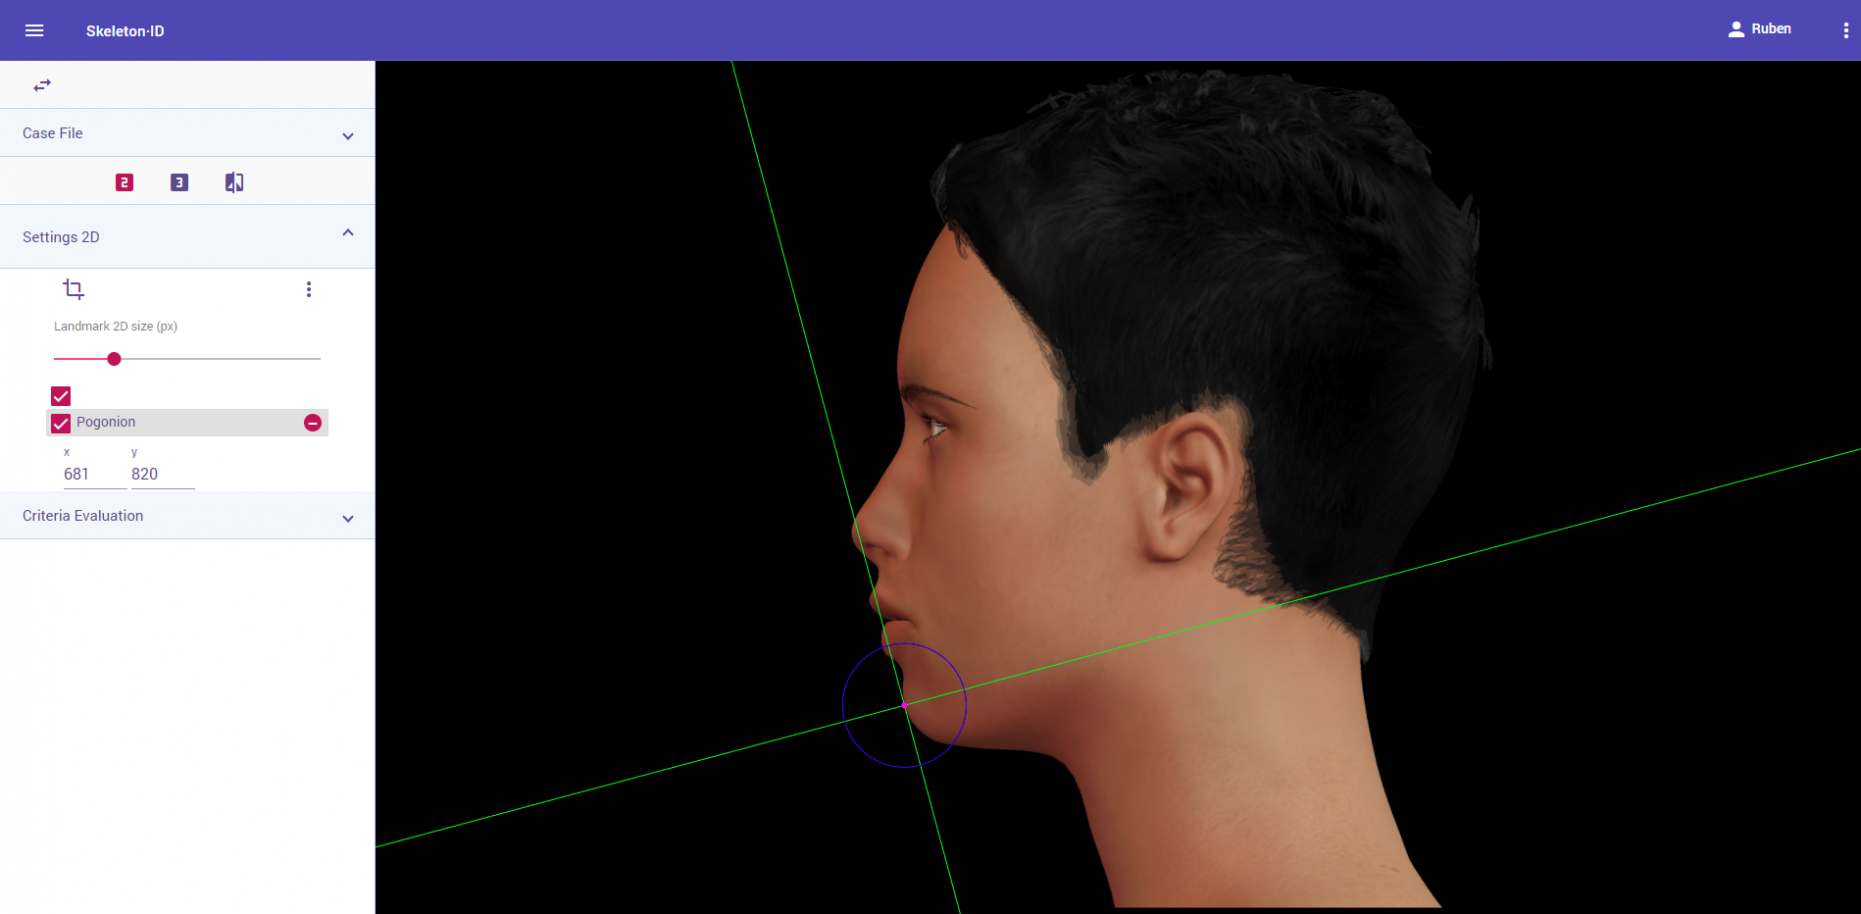 Figure 63. Pogonion in lateral view. General shot of the image.
 Figure 64. Pogonion in lateral view. Approximation in the image.
Guidelines for Skeleton·ID oblique view marking:
Place pogonion in the medial region of the mental protuberance, coinciding with the labial middle line in oblique view. The vertical auxiliary line should be placed in the midsagittal plane of the chin (Cupid’s bow may be used as a reference) and the horizontal auxiliary line in the most prominent point of the chin.
 Figure 65. Pogonion in oblique view. General shot of the image.
 Figure 66. Pogonion in oblique view. Approximation in the image.
Observations:
- Avoid marking this point in subjects with thick facial hair.
 Figure 67. Subject with a thick beard that obscures the view of the menton.
- Avoid marking this point in subjects presenting cleft chin.
 Figure 68. Subject with cleft chin.
- According to interobserver studies (Campomanes-Álvarez et al., 2015), pogonion can be accurately placed with high frequency (80%) in facial images regardless of the view (frontal, lateral or oblique).
Photographic examples:
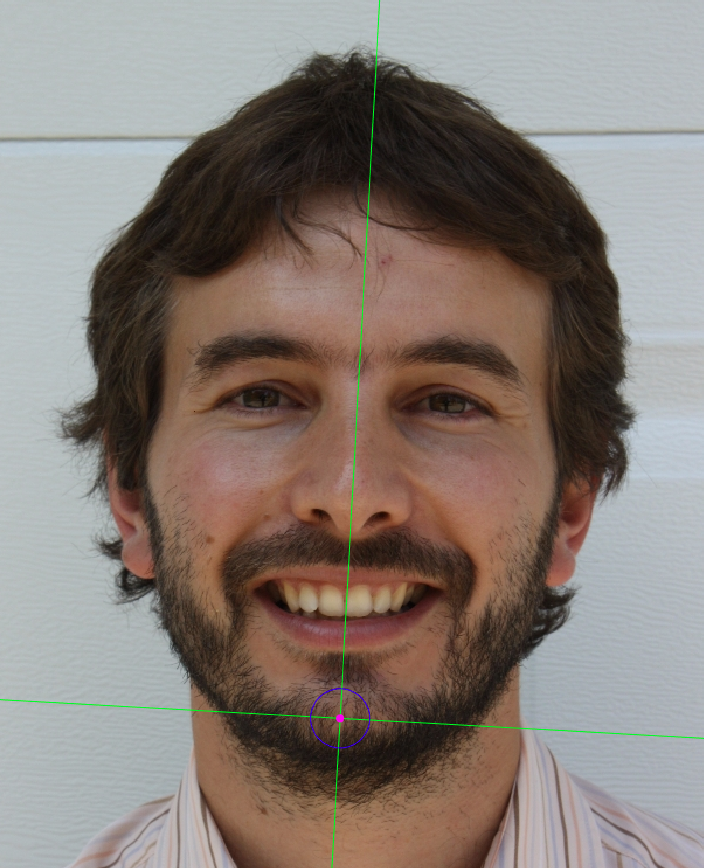
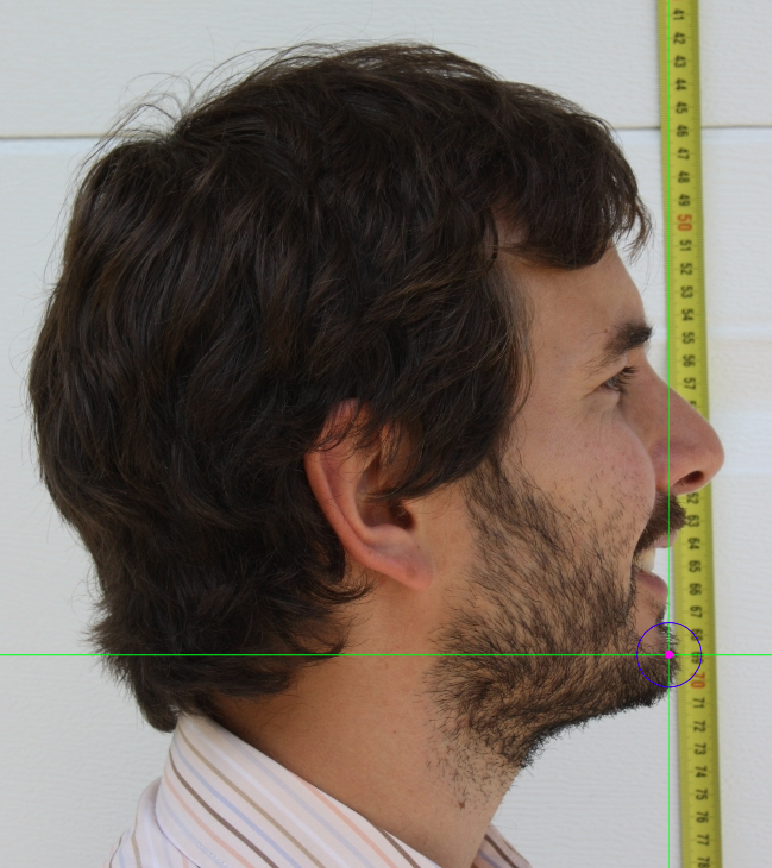
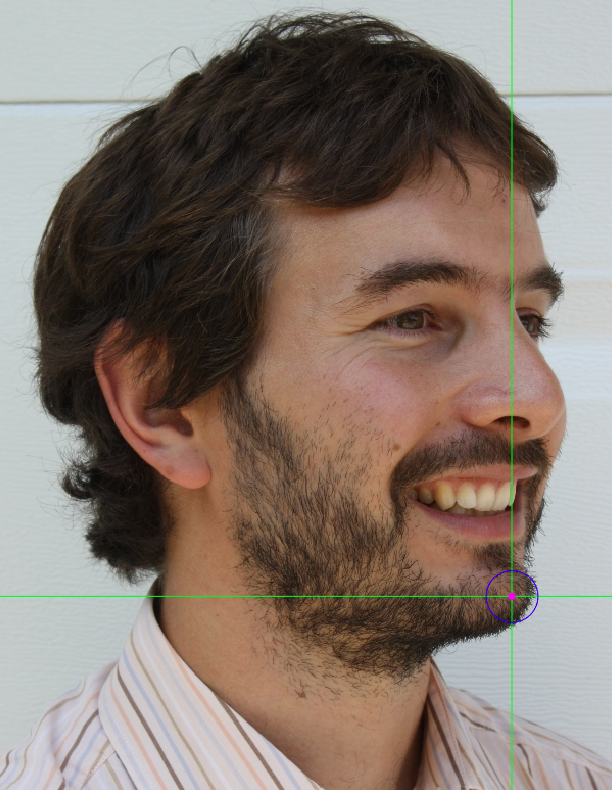 Figure 69. Pogonion marking on a photograph in frontal view (left), lateral view (center) and oblique view (right).
Gnathion
Abbreviature: gn´
Laterality: Medial
Type: 3
Standardized definition (Caple y Stephan, 2015): Median point halfway between pg´and me´.
Approximation in the image: Zoom in on the lower half of the chin area.
Anatomical reference areas: Inferior contour of the mental protuberance.
Guidelines for Skeleton·ID frontal view marking:
Place gnathion in the lower region of the mental eminence, coinciding with the labial middle line, between pogonion and menton in frontal view. The vertical auxiliary line should be placed in the midsagittal plane of the chin and the horizontal auxiliary line halfway between pogonion and menton.
 Figure 70. Gnathion in frontal view. General shot of the image.
 Figure 71. Gnathion in frontal view. Approximation in the image.
Guidelines for Skeleton·ID lateral view marking:
Place gnathion in the midline point on the curve between the most anterior and the most inferior points of the mental protuberance. Use the vertical auxiliary line as a reference. Note that in order to determine the most anterior and most inferior points of the contour of the mental protuberance it will be necessary to rotate the axis of the auxiliary lines to match the inferior contour of the chin.
 Figure 72. Gnathion in lateral view. General shot of the image.
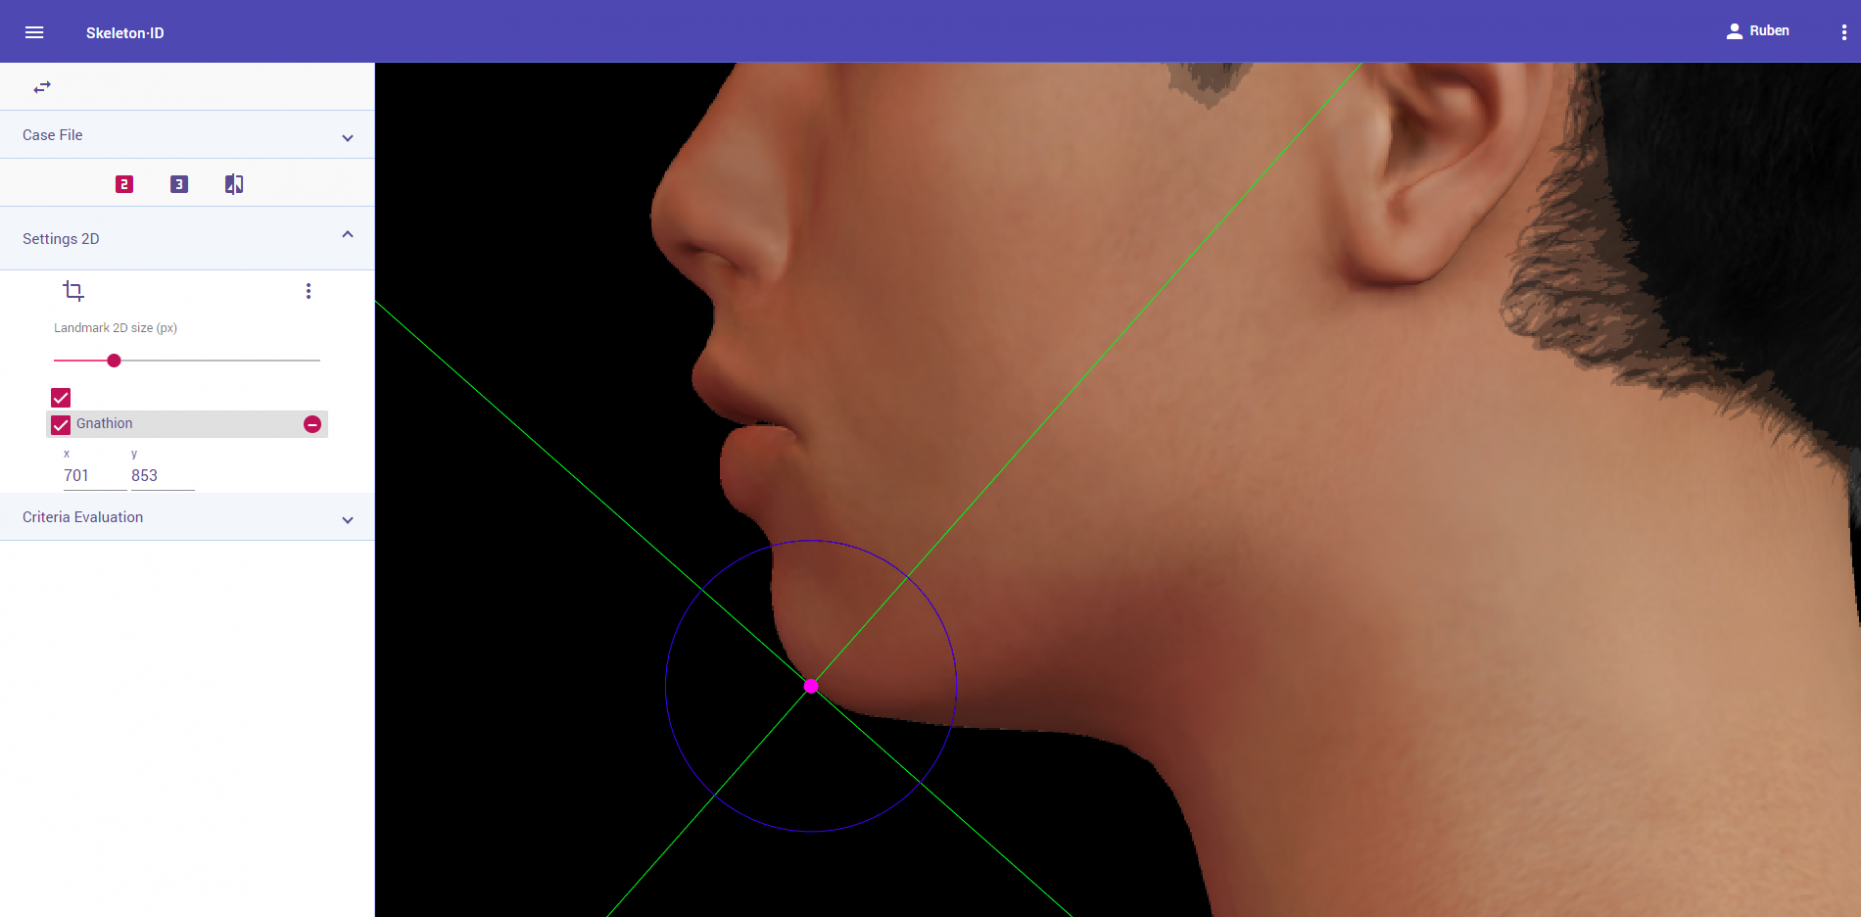 Figure 73. Gnathion in lateral view. Approximation in the image.
Guidelines for Skeleton·ID oblique view marking:
Place gnathion in the lower region of the mental eminence, coinciding with the labial middle line, between pogonion and menton in oblique view. The vertical auxiliary line should be placed in the midsagittal plane of the chin (the Cupid’s bow may be used as a reference) and the horizontal auxiliary line halfway between pogonion and menton.
 Figure 74. Gnathion in oblique view. General shot of the image.
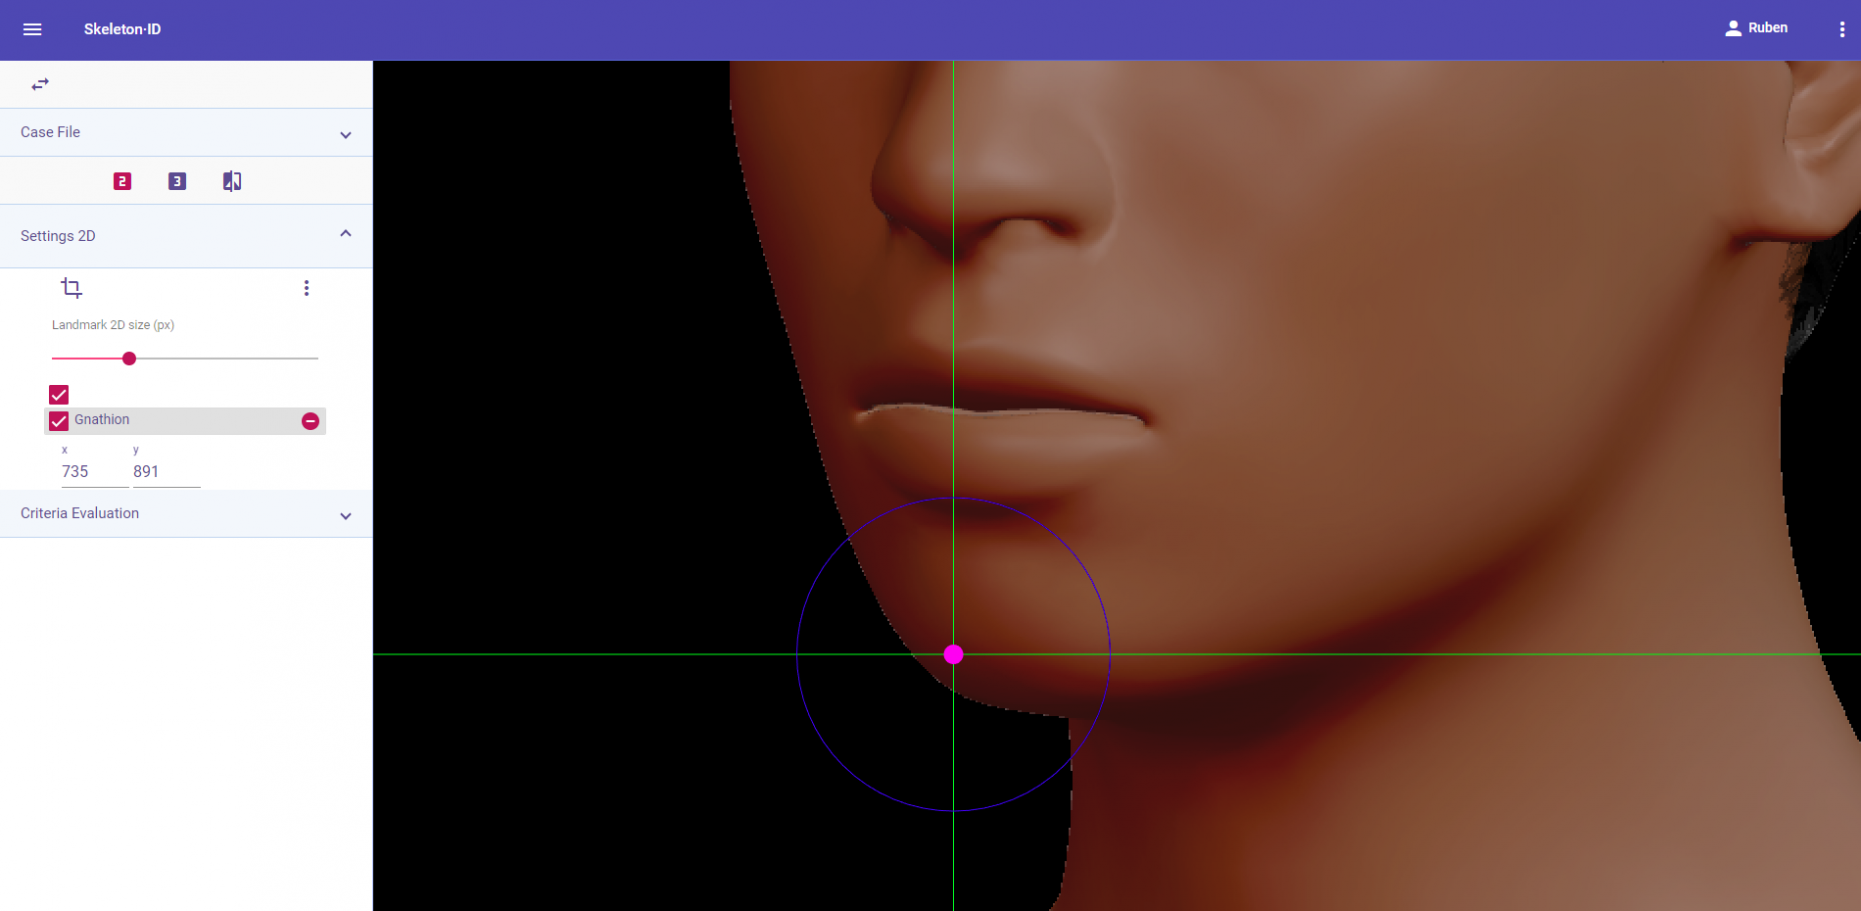 Figure 75. Gnathion in oblique view. Approximation in the image.
Observations:
- Avoid marking this point in subjects with thick facial hair.
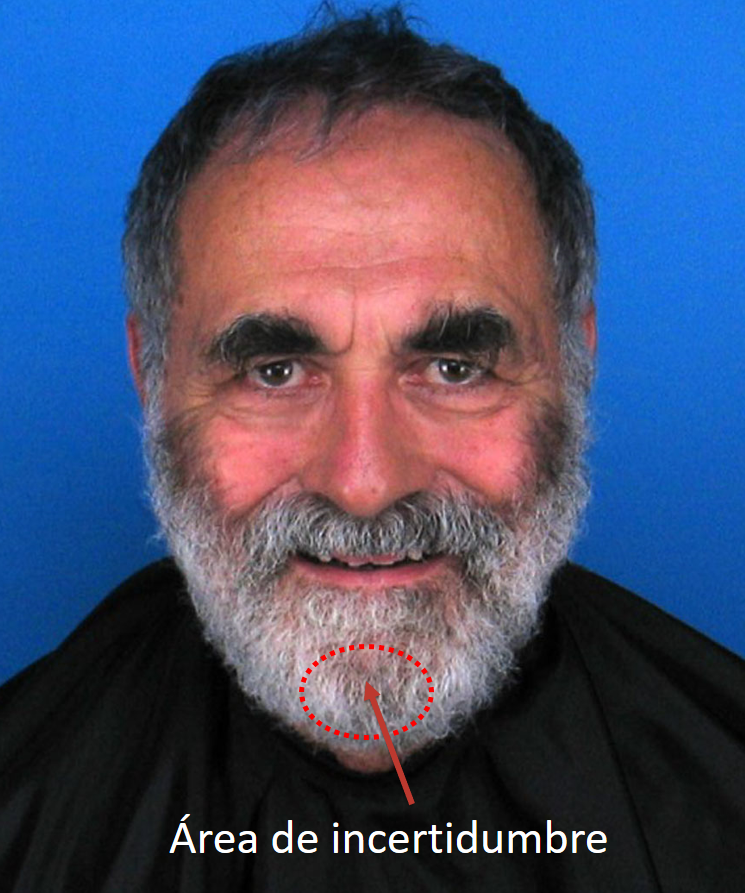 Figure 76. Subject with a thick beard that obscures the view of the menton.
- Avoid marking this point in subjects presenting cleft chin.
 Figure 77. Subject with cleft chin.
- According to interobserver studies (Campomanes-Álvarez et al., 2015), gnathion can be accurately placed with less consistency in facial images in oblique view.
Photographic examples:


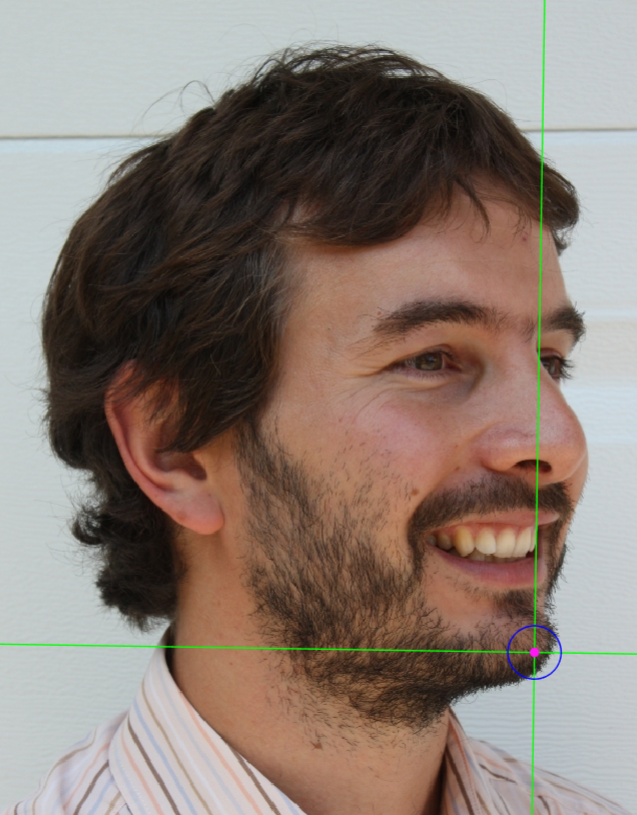 Figure 78. Gnathion marking on a photograph in frontal view (left), lateral view (center) and oblique view (right).
Menton
Abbreviature: me´
Laterality: Medial
Type: 3
Standardized definition (Caple y Stephan, 2015): Most inferior median point of the chin.
Approximation in the image: Zoom in on the lower half of the face.
Anatomical reference areas: Inferior contour of the mental protuberance.
Guidelines for Skeleton·ID frontal view marking:
Place menton on the inferior contour of the chin, coinciding with the labial middle line in frontal view. The vertical auxiliary line should be placed in the midsagittal plane of the chin and the horizontal line on the border (most inferior point) of the inferior contour.
 Figure 79. Menton in frontal view. General shot of the image.
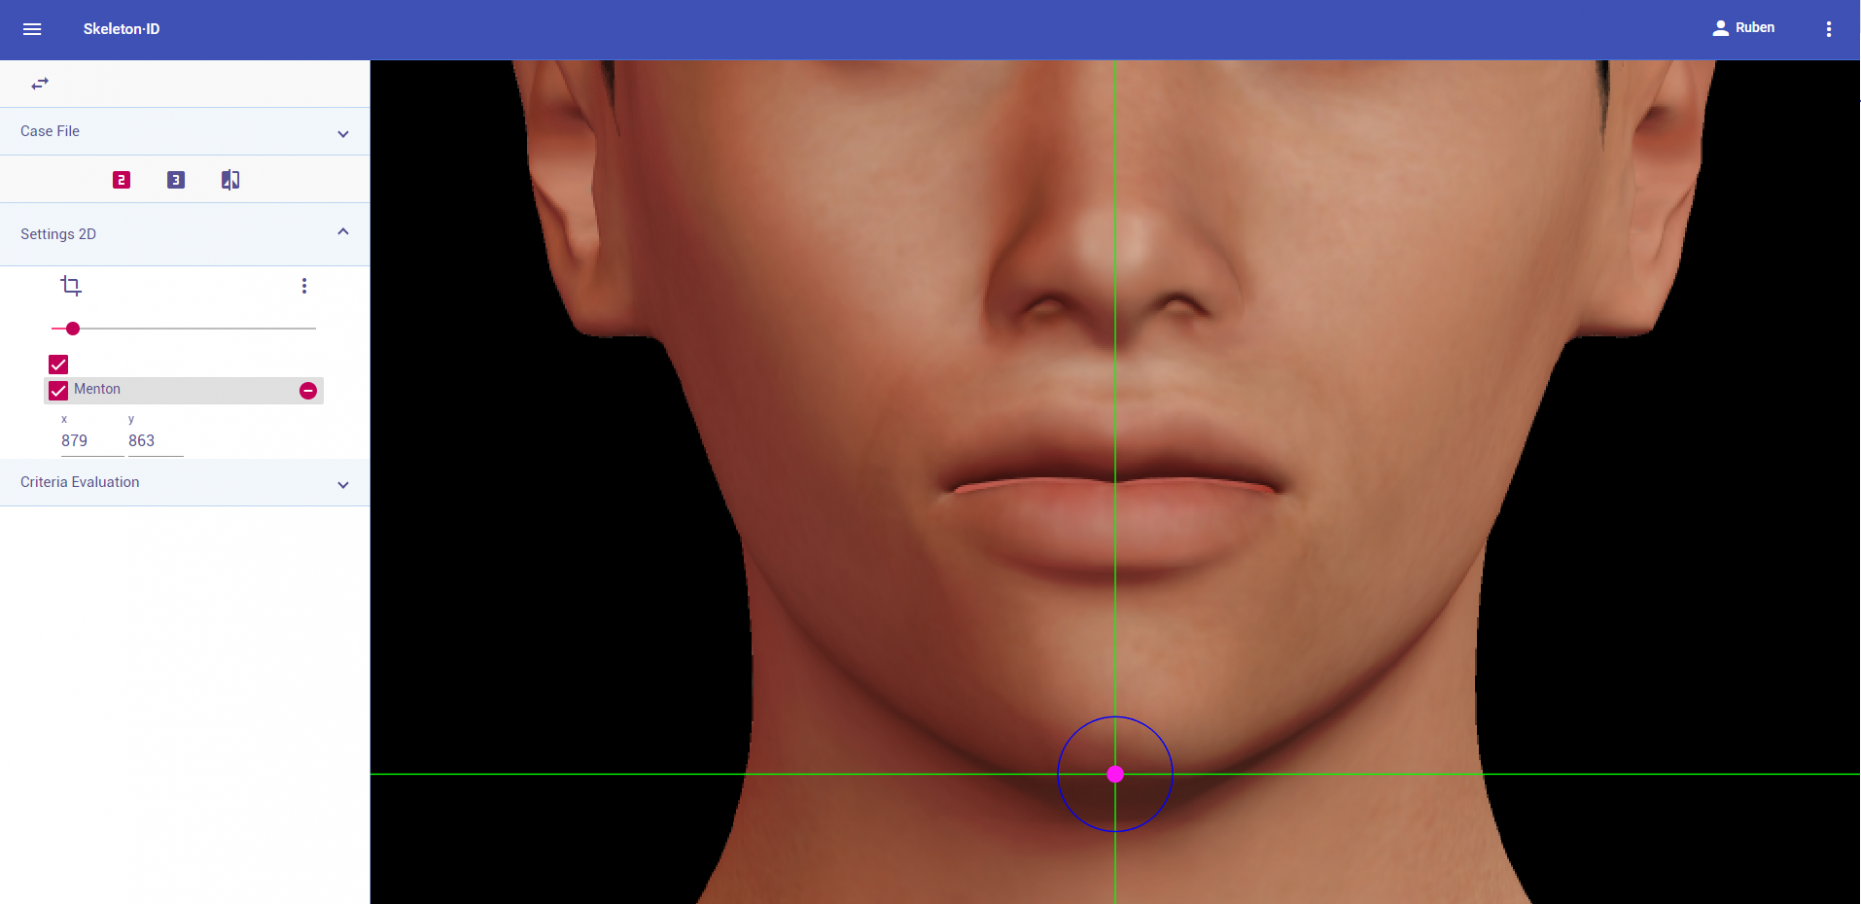 Figure 80. Menton in frontal view. Approximation in the image.
Guidelines for Skeleton·ID lateral view marking:
Place menton on the inferior contour of the chin, directly below the mental protuberance. Use the horizontal auxiliary line to determine the most inferior point of the chin and the vertical auxiliary line in the intersection with this point.
 Figure 81. Menton in lateral view. General shot of the image.
 Figure 82. Menton in lateral view. Approximation in the image.
Guidelines for Skeleton·ID oblique view marking:
Place menton on the inferior contour of the chin in oblique view. Place the horizontal auxiliary line at the most inferior point of the contour of the chin.
 Figure 83. Menton in oblique view. General shot of the image.
 Figure 84. Menton in oblique view. Approximation in the image.
Observations:
- Avoid marking this point in subjects with thick facial hair.
 Figure 85. Subject with a thick beard that obscures the view of the menton.
- Avoid marking this point in subjects presenting cleft chin.
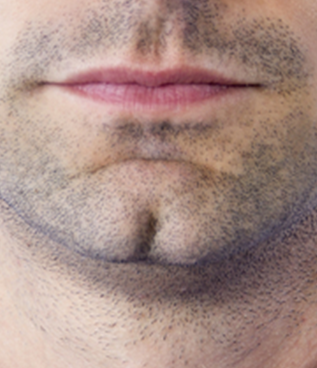 Figure 86. Subject with cleft chin.
- Depending on the head inclination and rotation it can be challenging to locate this point, since it is right underneath the mental eminence. The bigger the degree of inclination, the more substantial the error will be.
Photographic examples:


 Figure 87. Menton marking on a photograph in frontal view (left), lateral view (center) and oblique view (right).